
Like most people who wargame WWII the one thing I always wanted was an inner city layout to refight battles like Berlin, Budapest, Stalingrad (although due to the architecture and scale of destruction this probably requires a different set of terrain), Aachen and so on. Some six or seven years ago, I started on the first buildings using foam core, but to be honest, I have not gotten further than two partially completed buildings. There is an abundance of MDF products on the market these days, but there either are no inner city buildings or those that you can find seem to be geared towards 15mm. So I was quiet happy, when I found a Kickstarter that did fit my needs last year. What I did not realize back then was that this was actually run by Commision Figurines, who had already made a name for themselves in the smaller scales. With the Kickstarter funding, Walt (the owner) could finally get himself the larger laser to expand into 28mm. He ran into some problems at that point, when he had to find, that the new laser used a different file settings, so instead of just resizing his 15mm files to 20mm and 28mm he actually had to redraw all the files one by one, which took its time. Which in turn meant that since I had pledged for everything except the Stalingrad Mill (which I do by now regret not pledeing for as well), I had to wait through virtually all the process while those on 15mm or with fewer items got their models earlier. But to be clear, I did not mind since a) I did not want to start work before this summer anyway and b) I have hardly ever met someone as straightforward about these problems as Walt. I think we exchanged more than 50 messages over the months and he never gave me the feeling of being left behind. So in that sense I would always buy from him again!
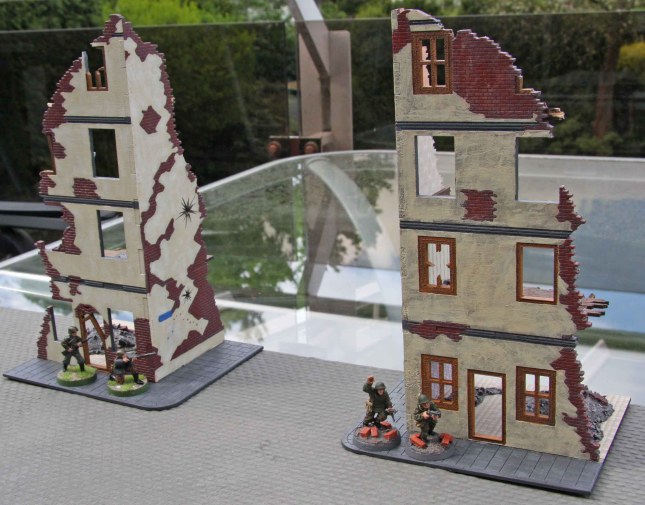
But now on to the models. While I have bought a whole bunch of buildings, I first wanted to do two test pieces. This has various reasons. For one, most of the WWII inner city buildings I see on tables are always grey. Nazi Germany (and the rest of fascist Europe) sure was a bleak and sad place at best. But that does not mean that everything was just grey. I was born in Germany in the late 70´s and some buildings had not been repainted since the war. While many had gone grey by then, one could clearly see that they once been painted in pastel colors, as well as the odd blue, green or red. Same goes if you look at the contemporary colour photographs. So I want my buildings to be in pastels or off whites as well, but I also had to see how this looked.
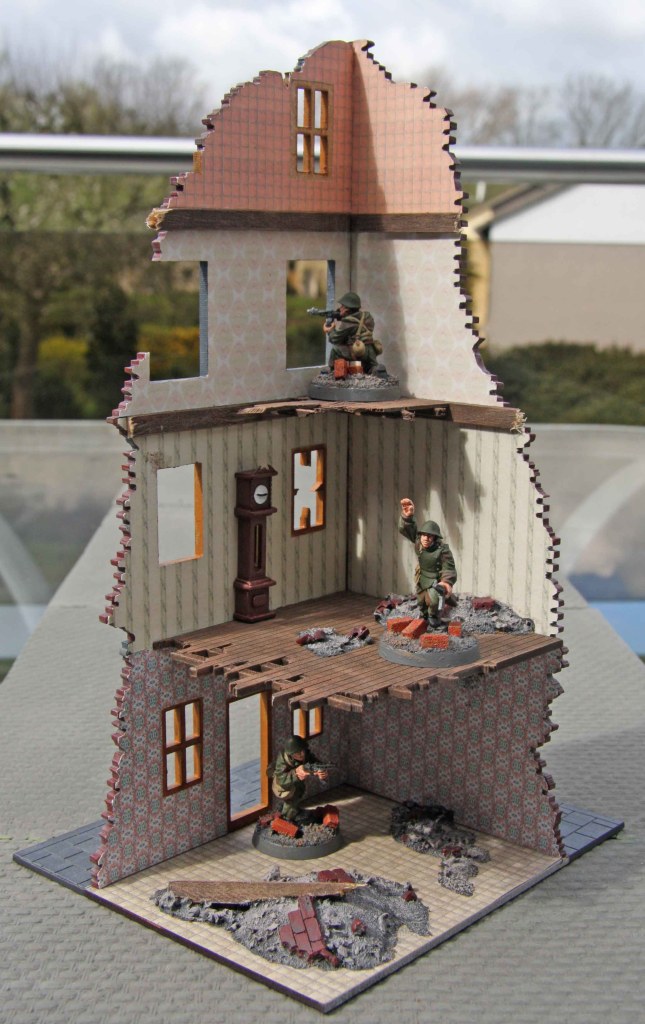
The other thing is, I usually find most terrain quite bleak, not like anyone had lived there before everything got shot up. So I wanted mine to look more lived in with wallpaper, tiles and furniture. But again, I had to see if this could actually be done. And here are the results:
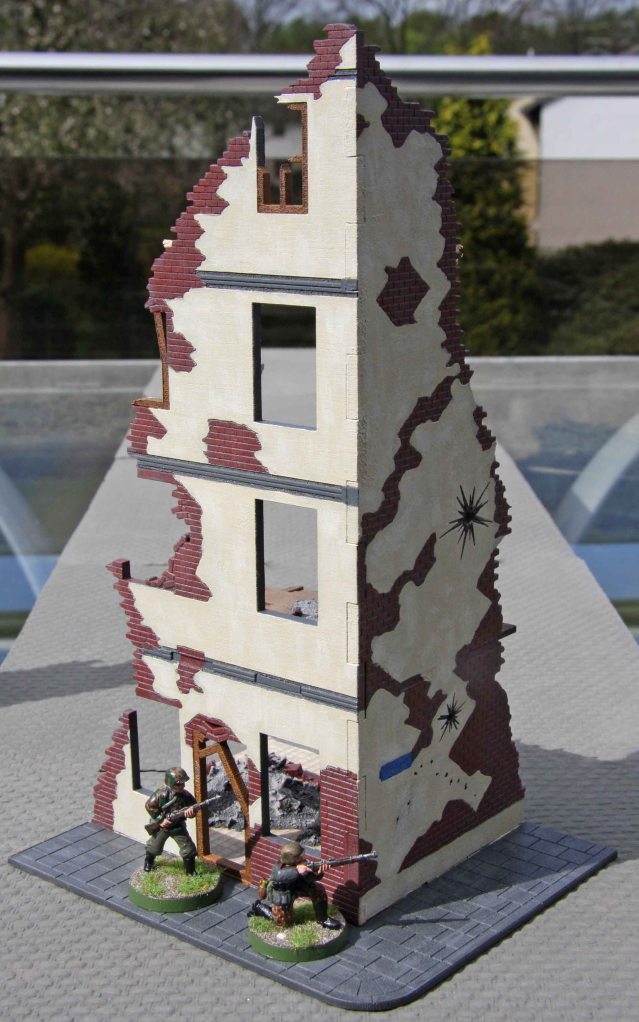
The roads will not remain like this. These boards were created all those years ago for my DIY beginning of this project and will probably not even work now. So I will either start from scratch or get myself the roads Walt sells for his buildings if they fit the width I want. But all this will be decided by my gut feeling and a MK I eyeball when more buildings are finished.
I wanted to give them a real contemporary feeling, so this building received a contemporary slogan. The same will happen to a lot of the other buildings along with posters, air raid markers, military signs and so on.
Here is a view of the inside, showing the wallpaper and tiles (all simple print outs glued to the walls). The brown planking on the walls was done to mask the seams between the wallpaper for the separate levels. I painted these in a dark brown. While it might seem unrealistic, I grew up in a house that was built before the war and in it, as well as in two others I helped renovate, a lot of the wood for the roof and flooring was painted in a dark brown. All the paint I have seen was pretty robust, so I assume this was to protect the wood from moisture and termites and I have kept to that colour as a result.
The rubble is made from scratch using pink foam (to get the hight), paving sand and wooden ledges. The bricks are from a Linka mould broken up and glued onto the pink foam before the sand. I know there is less rubble than there should be, but I once did a model with more realistic amounts of rubble and it became a real trick to do it in a way that minis could still be placed inside, so I kept things more moderate here.
The furniture is all cheap plastic dollhouse furniture that I repainted. I already repainted the all the furniture I have (some 70 odd pieces). I am not sure if I will actually have enough, so I used very little now. I think it looks to scarce, so I will probably have to buy more!
I deliberately did no rubble on the pavements. I later want to add things like lampposts and roadblocks. Before I do not know what the final set-up will look like, I will not glue any rubble on, that will later block the space for those pieces. Once I get a feeling for how all the pieces will interact, I will either glue on some rubble or do modular rubble pieces that can simply be placed on the terrain.
There is more to come on this so stay tuned, although the rest of this month will probably be taken up by miniatures.









Darrell Hindley
April 14, 2014 at 16:59
Looks pretty good but if you don’t mind me saying it could do with looking a tad more scruffy.
Cheers,
Darrell.
LikeLike
Burkhard
April 14, 2014 at 17:48
Thanks Darrell! I do not mind you saying so. You are not the first, so I will probably give them a blasting with the airbrush when I tackle the next batch!
LikeLike
aslfan
April 14, 2014 at 18:34
These are great, I really like what you have done with it.
I use Linka for rubble a lot as well.
Ian
LikeLike
Burkhard
April 14, 2014 at 20:14
Thank you Ian!
At first I thought about me regular method of just cutting up some foam core (like i did on the Soviet miniatures bases) but then I felt there was a simpler way. Can not be beaten, right! 😉
LikeLike
40kterminatus
April 15, 2014 at 02:23
Loving that toilet on the top floor.
LikeLike
Burkhard
April 15, 2014 at 06:26
Thank you Gareth! A hell of a place to take a leak! 😛
LikeLike
Wargamerabbit
April 15, 2014 at 08:14
Nice work Burkhard. You make it look too…”easy” but your time and effort shows. Top floor bathroom with a breeze…. Plumbing must be hardy (cast iron) to have the building almost destroyed but the “john” still works. Toilet paper roll? The wall paper touch is good…. three different patterns.
M aka WR
LikeLike
Burkhard
April 15, 2014 at 08:20
Thanks WR! It is amazing how long it actually took, but on the other hand I think I learned a couple of things that will make the next pieces go faster.
Originally the toilet was hanging from the wall (like the one in Saving PVT Ryan), but I did not like the looks of it so I did the floor to go underneath it. There will eventually be a toilet paper roll as well. The furniture set contained a holder, but I was so taken up repainting the big items, that I completely forgot to paint the small ones. So it will be added later on.
I just wish I had printed out more wallpaper pattern back then. Right now my colour cartridge is empty and I am rather waiting for a good cheap laser printer to be on offer in one of the electronics stores than buying a new cartridge.
LikeLike
Wargamerabbit
April 15, 2014 at 16:28
You also waiting on a good printer deal…. I am in the same boat. My printer “blocked up itself” last month and I have been gritting teeth. At least the toilet paper roll issue has been covered….
Still excellent work. I have a large collection of the old Battlefield Evo miniatures and “some day” I need to building my urban world. Your construction thoughts will surely come in good standing.
M aka WR
For now… I have a battle with Dromedaries to prep for this Sat…. ( Alexandria 1801 on WR blog).
LikeLike
Burkhard
April 15, 2014 at 19:07
The biggest problem I have is, that all the deals are always for inkjet printers. It is already hard enough finding one that comes with a scanner.
I know your feelings. As I said at the beginning of the post, almost every wargamer for modern periods needs (=wants) urban terrain.
I always felt Battlefield Evo was a bunch of lost opportunities. The quality could have been better, I never understood why they used hypothetical very near future and above all… dropped far too soon.
Looking forward to the Alexandria AAR. The latest AARs on your blog were real nice and provided so many great pictures!
LikeLike
ans
May 24, 2016 at 20:41
Great looking buildings! May I ask, how did you get the wallpaper matched up so well with the jagged edged bricks? Is it a case of sticking it then cutting it somehow?
Thanks
LikeLike
Burkhard
May 25, 2016 at 12:04
Thank you!
Yes, the wallpaper was glued on and then the brick shapes were cut out using a scalpel.
But I have to say, that afterwards I grew sceptical. In real life the wallpaper hardly rips along the outlines of the bricks. So with later buildings I just cut the wallpaper off close to the “break line” and oversprayed the area in brick and plaster colours with an airbrush to blend it in. Was much faster and looks as realistic.
LikeLike
ans
May 27, 2016 at 15:55
Managed to do a similar building like yours, pretty pleased so far with progress, love the wallpaper method ;] May I ask where the furniture is from, or what size it is, really adds character.
LikeLike
Burkhard
June 12, 2016 at 10:22
Sorry to take so long to get back to you… things have been very hectic these past two weeks.
I bought them from a dollhouse supplier in the US, but they have closed doors since then. At times I have stumbled over them at shows or on eBay. They are 1:48th scale and are themed sets (bathroom, living room, bedroom). Try those searches on eBay. Otherwise, 4Ground has some nice sets too, just a little more expensive.
LikeLike
ans
May 25, 2016 at 00:22
I tried to post earlier but I am not sure if it worked. May I ask how u matched the wallpaper up to the jagged edges of damaged bricks, did you just stick and then glue around it? GReat work.
LikeLike
Burkhard
May 25, 2016 at 12:06
Yes, it worked… I just need to approve first time posters, which delayed your post showing up.
LikeLike
ans
June 10, 2016 at 23:42
Do you remember where you got the dolls furniture from? Not sure if Dolls stuff is classified in sizes the same way etc. Looks great.
LikeLike
vonpeterhimself
April 15, 2014 at 11:04
Count me with several others here. I love the wallpaper and the indoor furniture, especially the open to view bathroom.
Salute
von Peter himself
LikeLike
Burkhard
April 15, 2014 at 19:09
Thank you, vP!
Imagine how much an open view bathroom costs you with a construction company these days. And the Soviets did this for free! 😛
LikeLike
daggerandbrush
April 16, 2014 at 00:52
I really like how you improved the already nice setup. Wallpapers, the toilet, the clock, just really brings the scenery to life. I would agree that some more dust and grime would add to the overall look, but as you say you will add that at a later stage.
LikeLike
Burkhard
April 16, 2014 at 07:28
Thank you!
Well i guess this settles it… I have no choice but to grime it up! 🙂
LikeLike
wgrevival
April 16, 2014 at 13:27
Nice. I’ve a church from Commission Figurines in progress. It’s lovely. And huge!
LikeLike
Burkhard
April 16, 2014 at 14:37
Got that as part of my pledge as well and it is absolutely gorgeous. My better half already said that she wanted to paint that one up and we are already working out things like stained glass windows!
LikeLike