With WWII being one of the bigger interests amongst my group, it is obvious that replaying Normandy is a must. So about seven years ago I set out to model one of the more striking terrain features there… the bocage or Normandy hedgerow.
We all know the basic idea of this. Over the centuries the farmers took the stones from their fields and build walls around the later with said stones. These would overgrow with hedges and trees forming obstacles either side of the road.

Bocage cut through diagram
Now this might seem simple, but it is not. The Normandy / Calvados region of France is vast. The Lower Normandy (Basse-Normandie), which roughly equals the region of the Normandy fighting in 1944, encompasses 17,589 km2 [6,791 sq mi] and one can hardly expect every hedgerow to look the same or follow the same blueprint in such a vast region. In fact like a friend of mine from France (who was actually born in Normandy) once pointed out to me, in the region around Caen it is often far lower and more like a regular hedges then in other parts. From my own trip to Normandy I remember driving over some roads near Sainte-Mère-Église that were far taller than a man and gave you the feeling of a tunnel.
Same goes if you are reading combat accounts. Some men describe them low enough to shoot over, others said that it was tall enough that the commander could not look over it from a Tiger tanks turrets. Donalds R. Burgett (a paratrooper in the 101st Airborne) describes them scaling bocage higher than walls during the assault on Carentan. I have read a report of a tank driving over it and pushing it flat to the ground, only for the hedgerow to “bounce” back up once the weight was removed, indicating much less soil and more undergrowth in it.
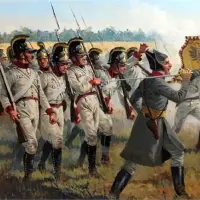
So here are some pictures from 1944 to give you some idea of the diversity of Bocage:

British AT gun in Normandy

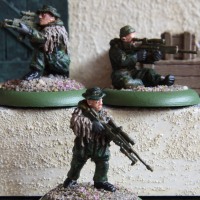
Fällschirmjäger in Normandy
")
Camouflaged Panzer VI (Tiger I) near Villers-Bocage
[© Bundesarchiv, Bild: 101I-738-0275-09A]

Sherman “dozer” in the bocage
[© CR Basse Normandie – National Archives USA]
![Norman Hedgerows [today]](https://dhcwargamesblog.files.wordpress.com/2012/07/bocage.jpg "Norman Hedgerows [today]")
Norman Hedgerows
[today]
From the first moment this was not without problems. The coverage of the flock was not as I had expected and a good amount of the brown would shine through. Which was not that bad at first since it still looked OK. But then of the next few month something happened… the brown got lighter. I am not sure why. The pieces were stored out of direct sunlight, so it must have been some kine of chemical reaction between the foam and the paint. Anyway the paint looked rather orange then brown after a few weeks and this is what it looked like:
![Bocage [before the overhaul]](https://dhcwargamesblog.files.wordpress.com/2012/07/bocage-before-the-reoverhaul.jpg "Bocage [before the overhaul]")
Bocage
[before the overhaul]
![Bocage [before the overhaul]](https://dhcwargamesblog.files.wordpress.com/2012/07/bocage-before-the-remodelling.jpg "Bocage [before the overhaul]")
Bocage [before the overhaul]
My first idea for the visible sides had been to airbrush them, trying to keep as much of the original flocked look as possible. This proved futile. The flock would soak up so much paint that each piece took about half an hour to airbrush and the visual effect was minimal. With enough bocage to cover a 2m x 3,5m table this would have taken weeks and still not have produced something visually pleasing. So I took more extreme measures and painted everything over with the same dark green mix I had used for the edges. It looked good, but caused another problem, since it loosened the flock. So I mixed some white glue into the mix and painted that on. Well I rather soaked it on judging by the amounts of paint being sucked up by the flock. Once dry (this took two days in direct sunlight with the amount of paint being sucked up) I drybrushed it in a lighter olive-green. I had planned to drybrush it with an ochre tone as well, but already liked the looks after that and left them this way.
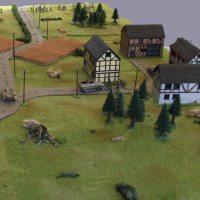
![Bocage [after the overhaul]](https://dhcwargamesblog.files.wordpress.com/2012/07/bocage-4.jpg "Bocage [after the overhaul]")
Bocage
[after the overhaul]
![Bocage [after the overhaul]](https://dhcwargamesblog.files.wordpress.com/2012/07/bocage-3.jpg "Bocage [after the overhaul]")
Bocage
[after the overhaul]
![Bocage [after the overhaul]](https://dhcwargamesblog.files.wordpress.com/2012/07/bocage-2.jpg "Bocage [after the overhaul]")
Bocage
[after the overhaul]
![Bocage [after the overhaul]](https://dhcwargamesblog.files.wordpress.com/2012/07/bocage-1.jpg "Bocage [after the overhaul]")
Bocage
[after the overhaul]
Sure this might not be the best bocage terrain for wargaming out there, but I am much happier with it now. By the way, I shall do the lower versions soon, too, but I am planing on a much more straight forward approach there.


Ross
July 8, 2012 at 11:17
Great article and I enjoyed the way you have blended your research into your project.
Cheers,
Ross
LikeLike
Burkhard
July 8, 2012 at 11:41
Thanks a lot Ross!
LikeLike
Burkhard
July 8, 2012 at 11:29
Oh by the way… this is in 28mm!
LikeLike
Monty
July 8, 2012 at 16:41
Very nicely done! I like the backstory and the great results!
LikeLike
Ray
July 8, 2012 at 18:40
Excellent work, very nicely done!!
LikeLike
The Angry Lurker
July 8, 2012 at 21:33
Good grief, that’s impressive scenery mate…..
LikeLike
Burkhard
July 9, 2012 at 10:04
Monty, Ray & Fran… thanks for the nice comments mates!
LikeLike
Ross williams
January 2, 2013 at 01:03
nice work, it is also my favorite period
LikeLike
Burkhard
January 2, 2013 at 20:38
Thank you Ross, glad you like them!
LikeLike