RSS

Category Archives: Artizan Miniatures [Art]

Crisis 2014 – Our game

Crisis 2014 – Our game

OK, now that things have settled in a little bit more, here are some pictures from our very own game at Crisis too.

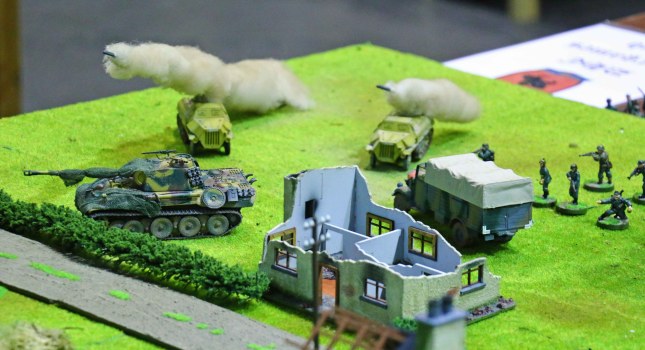
We did run a demo for Battlegroup: Overlord. All in all the game was quite uneventful. A British unit consisting of two Troops of Shermans, a Troop of Honeys, three sections of Motorized Infantry and the usual support up against German ad hoc defenders from a Wehmacht unit with a few Panzer IV, a Panzer V, a 5cm and 8,8cm PaK each, Infantry and Panzerwerfer. The Brits had to expel the Germans and if possible destroy them. In the end both sides traded shots over the river. The Germans seemed unable to hit the broad side of a barn and the Brits were able to hit, but their shots simply bounced off the German armour (and not just the Panthers armour). All the while the British off-board artillery did a good job at pinning German troops, which in turn did a good job at recovering. In the end the only casualties were a Firefly (which took a direct hit from a Panzerwerfer rocket) and a Sherman taken out on the bridge by a Panzer IV.

Before I give you the pictures, I would like to say thank you, to the Tin Soldiers of Antwerp for running another fabulous show. As usual I am really looking forward to next year. I would also like to thank Julian for being my partner in crime this weekend. Also thanks to all those who stopped by to ask about the game and the nice comments! Also all the friends (not going to mention any names, since there would be more than two dozen and I would not want to miss anyone) who came by or into whom I ran at the show. It was just great chatting to you guys!!!

Crisis 2014 - The whole of the table

Crisis 2014 – The whole of the table

Crisis 2014 - Sherman troop on the move

Crisis 2014 – Sherman troop on the move

Crisis 2014 - Panzerwerfer firing

Crisis 2014 – Panzerwerfer firing

Crisis 2014 - Firefly taken out be a direct hit from a Panzerwerfer

Crisis 2014 – Firefly taken out be a direct hit from a Panzerwerfer

Crisis 2014 - Panzer in defensive positions

Crisis 2014 – Panzer in defensive positions

Crisis 2014 - British Shermans driving up to the bridge passing the burning Firefly

Crisis 2014 – British Shermans driving up to the bridge passing the burning Firefly

Crisis 2014 - Moving up to engage

Crisis 2014 – Moving up to engage

Crisis 2014 - A bridge too far for this Sherman

Crisis 2014 – A bridge too far for this Sherman


Battlegroup Fall of the Reich AAR (somewhere in Germany)

Battlegroup Fall of the Reich AAR (somewhere in Germany)

Friday I finally wanted to give my newly painted British an outing, so Julian, Martin, his son Max and I met for a game of Battlegroup: Fall of the Reich.

Martin and Max played the British (decided by the roll of a die). Their troops consisted of a forward headquarters on foot, a forward observer team and a scout team, each in a Bren Carrier, a veteran infantry platoon on foot (consisting of a command squad, three rifle sections, a 2″ mortar team and a combat medic) as well a troop of Shermans (two regular ones and two Fireflys) and a supply truck. The forward observers had access to a two-gun battery of 25pdr. guns and a medium priority artillery request up the chain of command.

Julian and I played the German defenders. They had a forward headquarters team and a forward observer team in a Kübelwagen each, a sniper, a grenadier platoon on foot (consisting of a command squad, three grenadiers squads, a combat medic, an HMG team with extra ammo carriers and a 7,5cm PaK40 with extra ammo carriers) and a PzKw IV H platoon with three tanks and a supply truck. The forward observers had access to a two-gun battery of 8.8cm guns and the whole force  benefitted from two special abilities which raided their battle group rating (for those not familiar with the rules… the point where the whole battle group breaks).

The Germans were defending a small village somewhere in the west of Germany. The village was overlooked by a large hillside on the British table edge and surrounded by woods, an orchard and some yet unplowed fields. There was also the wreck of a Tiger tank left from previous fighting. We played the delaying action scenario, which meant that either side had to bring the others battle group rating down to zero to win. If neither side had managed to do so by the end of round 9, it would be a German win, since they had managed to hold up the allies long enough. For those not familiar with the rules: each time one side looses a unit (or something just as traumatic happens) or if the other side takes an objective, it has to draw a random chit. While some indicate random events, most carry a value used to reduce the battle group rating. For completeness sake, we had four objectives on the table, but these had little importance on the game since each side took the two closest ones.

The British started with just their scout team deployed on the road leading down the hill, but would get continuous reinforcements every turn. The Germans had to roll for starting forces and did badly. So the only troops on the table were a squad of infantry, minus their LMG element hiding in one of the ruins with and objective marker, the observer team hiding in the upper floor of one of the intact houses (leaving their Kübelwagen in the front garden) and the sniper hiding under the roof of yet another house. One of the PzKw IV started on the table as well, but kept behind the row of houses not wanting to present a good target to the tons of British tanks that might come onto the table in the first round.

Table seen from the German side

Table seen from the German side

The British automatically got initiative on the first round, but rolled badly for their reinforcements (just two units and they picked one of the Fireflys and the forward observer team). So the scouts just raced forward to the woods on their right flank, while the observers in the other Bren carrier raced forward to a hedge to hide there and claim their first objective marker. The Sherman just rumbled forward on the road. There was not much for the Germans to do, except for the infantry to claim to objective marker by their ruins and for the Panzer to drive towards the left flank, to get a bearing on the Firefly, while hopefully being in a position where other British tanks would not be able to get a shot at it once they arrived on table. The forward observers though called for an artillery strike on their British counterparts which was not right on spot, but close enough to pin the British observers and rattle the crew of the Firefly.

PzKw IV in firing position

PzKw IV in firing position

The next round the Brits had the initiative (actually we just forgot to roll for it and just handed it to them). Again they rolled poorly for reinforcements and only got the forward HQ on table (with the intention of quickly unpinning the observers) and some infantry. All the British units advanced, with the exception of the scout, who just stayed put. The observers were unpinned. Now things were handed over to the Germans. They only had a 33% chance for reinforcements every turn from this the second onwards, but they got some on the first try and even 5 units at that. So onto the table came the other two PzKw IV with the supply truck as well as the PaK and HMG teams. All these advanced towards the front, with the Panzer that had already been on the table loosening off a shot at the Firefly, but missing it. Again the German observers called in their artillery and this time it was true on target blowing the Bren carrier with the observer team up and killing two of the soldiers in the British forward HQ. This meant that the British would be unable to call for artillery of their own for the rest of the game.

PzKW IV

PzKW IV

The next round was actually quiet uneventful. The Germans just kept on advancing and the Panzer on the left flank and inside the village fired at the Sherman but found their shots just bouncing off or missing. For once during the whole game the German observers were unable to contact their off-board artillery which gave the British some respite. The German HMG team took the other objective while moving forward and that was about it. The British rolled good for reinforcements and got another infantry squad, the two regular Shermans and the supply truck on the table. The forward Firefly shot back at its assailants, but missed both its shots. Otherwise the rest of the troops just advanced.

Sherman firefly

Sherman firefly

Holy cow... the British are advancing

Holy cow… the British are advancing

The next round was actually quiet with the two PzKw IV trading shots once more with the Firefly with similar results. The Panzer on the right flank advanced and began to fire at the scout team. The German artillery tried to take out the supply truck, but only managed to kick up some dirt. Again, the troops on both sides just kept advancing, with the British infantry taking another objective as well. Also the Germans moved the supply truck forward (they had previously parked it outside of view behind a row of houses) in anticipation of ammo running low on the two tanks that had seen firing for some time now.

Truck moving into position to resupply one of the PzKw IV [photo had to be edited to conform with German law]

Truck moving into position to resupply one of the PzKw IV
[photo had to be edited to comply with German law]

British lines

British lines

As usual, the next round began with the Germans taking initiative and again the Panzer traded shots with their targets, with the usual nonexistent results. The one on the left flank, which had started the game on table revered to take up ammo at the supply truck. The HMG team set up position in the middle of the village and the PaK moved forward for the final time on the right flank. And again the German forward observers called in artillery to take out the British supply truck. The fire only managed to shower the supply truck and the forward Firefly with dirt, but one shell landed directly on the rear Firefly, setting it on fire. The British also got their final reinforcements on table.

View from the village towards the British

View from the village towards the British

That is why the Germans called it the "Tommie Toaster"

That is why the Germans called it the “Tommie Toaster”

On the British side the infantry and regular Shermans advanced, the later to finally get within firing range. The remaining Firefly got off one shot before it ran out of ammo. And this shot hit the freshly reloaded Panzer, punched through and exploded it, too. The British were happy that they finally had been able to destroy a German target, but it was short-lived, when we drew an Air Attack counter instead of one that would reduce the German battle group rating. But no German plane showed up, so at least no insult was added to injury.

British advance

British advance

The next round saw the Brits actually win initiative the only time during this game. They rolled poor on orders and so there was only a limited advance. The Firefly was resupplied, while the lead Sherman fired at the PzKw IV in the village and set it on fire, too. Again Martin and Max rejoiced the fact that the Germans had to draw a chit, but this time insult was indeed added to injure, since Julian drew a Breakdown counter, which resulted in the remaining Firefly to run out of fuel, being immobilized for the rest of the game.
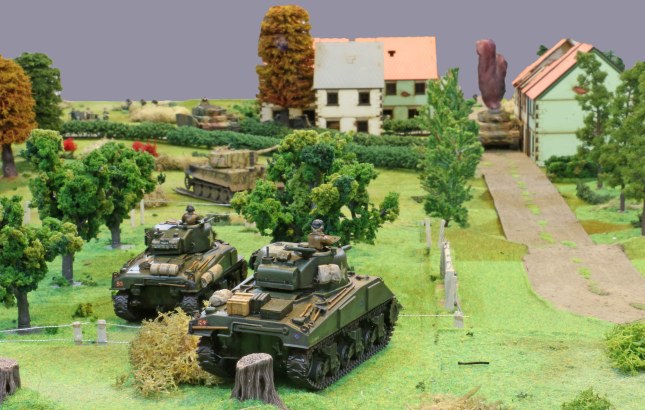
Shermans advancing on the village

Shermans advancing on the village

With initiative shifting over to the Germans, the artillery now started concentrating on the poor bloody infantry, wiping out half a squad on the British left in the process. The PaK finally opened up as well, but missed all three shots directed at the lead Sherman. The remaining Panzer fired at the Sherman as well, but failed to hit. But as an icing on the cake, the Germans finally got further reinforcements, too. So now the forwards HQ, one more infantry section and all three infantry sections LMG teams entered the table as well.

PaK 40

PaK 40

During the eighth round we saw more of what we had seen before… tanks and AT guns fringe at one another, but hitting nothing. Again the German artillery shifted targets to the scout team still hiding in the woods. This time their fire scattered badly, but landed virtually directly on the 2″ mortar team which had been sneaking up through the woods, wiping it out. With only one round to go and hardly any chance to bring the Germans to breaking point, the British decided to call it a day. Which was probably a good idea, since the German battle group rating was only down to 31 (from 37), while the British was down to 8 (from 32).

Shermans in the orchard

Shermans in the orchard

It was a bit sad, that on the German side the only damage was dealt out by the artillery and on the British side only by the tanks. But this was mostly down to the dice luck. Another deficit (and this was entirely my fault), was to give the British infantry no transports, which kept them out of firing range for the game, once we Germans were happy to stay inside the village. I guess i must really tackle some Kangaroo models or another M5 soon so we can use a whole mobile platoon for late war games soon.

PzKw IV in the village

PzKw IV in the village

But I think, that it still was a fun and taxing game. Had the British managed to keep their observers in the game (or even fired at ours), this could have turned around easily and Julian and I certainly felt that spectre hanging over heads.


The thin red… err brown line

The thin red… err brown line

As some might remember, I decided to build my WWII British forces this year. Essentially this meant starting from nothing and ending the year with at least the Infantry platoon, two Sherman and a Churchill troop, Bren carriers, AT guns and some Recce elements. If everything went fine also some Funnies and Cromwells, but I do not want to push things too far.

With the armour progressing well (only the Churchills and Recce tanks missing) it was time to finish off the infantry. Having finished all the support, command, NCO and squad based heavy weapons already, it was time for the riflemen now. And that was not the most entertaining work, so doing 40 poor bloody infantry in one go proved a stupid idea. Even though I decided them into two batches, I still felt my interest drifting to other topics all the time. So essentially while these were started in April before our holiday, I only finished them this week. But I am happy I am done with them, since the only things missing now are the bicycle messenger, some extra AT crews and a three men having a brew diorama.

But now on to the minis. They are a wild mix of Victory Force Miniatures, vintage (=pre-Warlord) Bolt Action Miniatures and Artizan Miniatures. Again all painted to represent the South Lancs. Here are the infantry sections. The SGTs and Bren teams were painted earlier on, but I felt it would be stupid to show them without. Please note that the squad composition is not definitive, I just assembled them at random yesterday.

British Infantry (1st Section)

British Infantry (1st Section)

British Infantry (2nd Section)

British Infantry (2nd Section)

British Infantry (3rd Section)

British Infantry (3rd Section)

British Infantry (4th Section)

British Infantry (4th Section)

British Infantry (5th Section)

British Infantry (5th Section)

There are also more riflemen and the 2″ mortar (one was still on the TO&E late war and usually attached to platoon HQ). I have to say, that I am not sure what I painted all these extra riflemen for, since they sure cannot all be part of the HQ element. A couple of years ago I spend an afternoon in the Imperial War Museums library researching this and I am sure these are needed to bring the platoon to strength, but the information is safely written down in a notebook that my better half safely put away over the winter… but cannot remember where. :-/ So until I find that notebook or can remember what I painted these for, these are just the extras.

British Infantry (the extras)

British Infantry (the extras)

And then there are also a few Sappers to round things off. These minis are all from Warlord Games and I have to say, I am happy they do without those stupid cartoon faces they use for the German with the metal Brits!

British Sappers

British Sappers

And last here is a group shot of all the infantry (minus the Mortar and AT teams).

British Infantry group shot

British Infantry group shot

So this is it for today. I started work on the prize minis yesterday and hope to have them done by the end of this weekend or early next week when I will post pictures of them before they go in the mail. After that it is going to be those Murawski Poles and after that… well no idea yet! 😀


WWII British mortars and guns (Analogue Hobbies Painting Challenge entry #11)

So now it is time to continue with my British Infantry platoon. Or in this case rather some ”very” heavy weapons for them.
Lets start off with the lightest of them all, a pair of 3” mortars. Medium mortars were a very essential of the lower level (company or handed down to platoons) support weapons, giving the soldiers on the ground limited artillery support without the need to go through higher level commands. I know many people just use only one in skirmish gaming, but my previous experience has taught me, that one simply does not make much of an impact on the game, while two do without becoming a game breaker. The minis are old vintage Bolt Action. Unfortunately this means that both crews are exactly the same, but maybe I will get me a Warlord Games team one day to give them more variety.
British 3" mortars [BA]

British 3″ mortars [BAM]

Now if 3” mortars are on the light end of the ”artillery” support a platoon can call upon, here is the heavy end… a 25pdr. artillery gun. I bought this well over half a decade ago, back when no one was producing any AT guns with the idea that this could give at least some heavy fire power to the poor bloody infantry. Not sure what I was thinking. I only ever read about the 25pdr. used for direct fire in North Africa and I only intend to war-game Europe. Anyway the whole set is by Artizan and actually quiet nice, even though it comes with their old style of faces, which I do not like too much. The only grief for me was that I found the limber to be missing one of the doors. Now after more than half a decade I did not want to approach the good people at Artizan for a replacement, so I scratch build one from plasticard and wire.
British 25pdr. [ART]

British 25pdr. [Art]

So do you care for some real AT guns? Well here we go. This is a 6pdr. gun. This time by Warlord games. Now you may find that this one (and the 17pdr. in the later pictures) have quiet a large crew. Now I bought the para version from Warlord some time ago but it arrived with a regular infantry crew. I got a proper replacement crew, but in the end it meant I had more crew than usual, which is nice. I had originally planned to do a cloud camo on the gun, but decided against it. The 6pdr.s were used by the US Army as well and I plan to use the gun for them, too. I know the Americans used it without the muzzle break and the green is wrong, but I guess most people will not notice. But I think everyone will notice a camo that was not used by the Armericans so I did without.
British 6pdr. [WG]

British 6pdr. [WG]
“Those skirts are not going to help you here!”

British 6pdr. [WG]

British 6pdr. [WG]

So now something heavier, a 17pdr.. Again the model is by Warlord Games with a little extra crew from their hic up. Not much to say, except that this one got the cloud camo since it was only used by the British. I was a bit afraid how this would come out with the weathering technique used on the British vehicles and guns (as described on the Universal Carrier post), but it really comes out well. I personally believe, that this is due to the fact that I did not use black for the camo, but a very dark slate grey.

British 17pdr. [WG]

British 17pdr. [WG]

British 17pdr. [WG]

British 17pdr. [WG]

So while I was busy painting guns, I decided to tackle some guns for the paras I had around as well. These are a 6pdr. (para version without the enfilade gun shield and collapsable legs) and a pack howitzer. Before anyone asks… the crews for these were painted some 3 ½ years ago and are just there as scenery and did not count for points in the Challenge. Those who have followed my painting adventures will notice that their eyes lack the black outlines I switched for in 2012, but with the the heavier shading of the skin I have used since 2010, so that is a good telltale sign of their age.
British Para pack howitzer [WG]

British Para pack howitzer [WG]

British Para 6pdr. [WG]

British Para 6pdr. [WG]

So this is it. As indicated before these were weathered the same way as my other British vehicles with a Modelmates weathering  washes and pigments from MIG. The crews all wear shoulder flashes from the 3rd Infantry Div, to make sure they match my other infantry. While painting these, I felt that a little more firepower might be due, especially one capable of taking on some big cats, so in due time these will see the addition of another 6pdr. and another 17pdr.. With this in mind I leave you with a group shot of this entry:
British Guns

British Guns

Coming up next… British M5 halftracks.


Ruperts on the way to the Rhine and other WWII British (Analogue Hobbies Painting Challenge entry #5.1)

Today I finally get around to show what I did between the second and third fortnight goals for the Analogue Hobbies Painting Challenge, namely the beginnings of my WWII British Rifle company. Well not really, as those who have followed this blog since the beginning, since I already painted all but one of the NCO´s, three medics and two snipers in 2012 (you can find the post here). Again the Miniatures are a mix of Victory Force Miniatures [VFM], pre-Warlord Games Bolt Action [BAM], Warlord Games (metal only) [WG] and Artizan [Art]. These were painted as three batches, but I wanted to varnish and base them in one go, so it took me a while longer to post them to Curt.
Up first are the Officers (Ruperts as most British soldiers call them… hence the pun in the title). Left to right these are BAM, WG, VFM and two Art. I feel that usually all lines mix quiet well (if you discount the Warlord Games minis having slimmer faces). In this case the WG officer is noticeably smaller, but I liked that mini too much not to paint him. All officers are from the infantry, except the one to the far right, who is painted to come from an armored formation.
British Officers

British Officers

Next we have a radio operator [WG] and the remaining NCO [VFM].

British Radioman and NCO

British Radioman and NCO

While I will tackle the riflemen in another couple of batches soon, I already did the section firepower, namely the Bren teams. The one to the far right is BAM, all the others are VFM. What always irritates me about the old Bolt Action British are their faces. If you look at the other work from Paul Hicks, they are so immensely detailed when it comes to the faces. I could never understand why these are so featureless. Probably part of the reason, why Warlord replaced them with new sculpts (thank god without those cartoonish faces sported by some of their other WWII ranges).
British Bren teams

British Bren teams

To complete the rifle companies heavy fire power, here are the PIAT teams. The first one is from BAM.

British Piat Team on the move [BA]

British Piat Team on the move [BAM]

Up next the first in firing pose from VFM.
British PIAT team [VFM]

British PIAT team [VFM]

And last another one in firing pose from BAM. One of the few sets in the old range that had decent faces. The German Panzer in the photo was not painted as part of the Challenge and is just there for the atmosphere.
British PIAT team [BA]

British PIAT team [BAM]

Now we have some serious firepower. While not part of the company level assets, a scenario can always require you to have a Vickers or two and looks wise, this has always been one of my favorites machine guns of WWII, So I could not do without. The first one is BAM. The gunner does not look as nice as he could, but I still had it lying around and if you want two Vickers, more variety looks better on the table. The loader for this one gave me no joy. When I was doing the sand on the bases (always do that after painting and varnish) he slipped my fingers and dropped into the open can with brown paint. I pulled him out before he could go under and put him under running water,  but the damage had been done and I had to paint him once more. 😦
British Vickers team [BA]

British Vickers team [BAM]

The other Vickers is by WG. All around a lovely set and maybe my favorite from their whole British range.
British Vickers team [WG]

British Vickers team [WG]

British Vickers team [WG]

British Vickers team [WG]

Now some of you may have spotted some should flashes in the previous photos. All these men are meant to be from the 1st South Lancashires. 3rd (British) Infantry Division was an easy choice for me, since they landed on D-Day and saw action in many of the major operations of the war. So there is a lot of milage in them. The Regiments are distinguished by the bars under the flash (one in case of the 1st South Lancs) so they can easily pass as one of the other regiments on the tabletop. And I can live with patches for the wrong unit in case I want to replay something where troops from a different Division took part. The choice for the 1st South Lancs is actually a little more obscure. There are some things about the D-Day landings I absolutely want to replay and one of them is Sword Beach: Queen White (Brèche d´Hermanville) and this was their landing beach. If you want to know more about the Regiment, you can find a very good summary of their actions on the website of the Lancashire Infantry Museum

Anyway, here is a picture showing the unit flash. These were painted freehand on both the left and right arm of all the minis. Again this gave me some greif, since I managed to paint the colors of the triangle in reverse on both the 2nd and 3rd batch and I had to go back to these.
2nd South Lancs shoulder flash

1st South Lancs shoulder flash

So to give an idea of them all, here is a group shot. 28 minis in total.

British group shot

British group shot

Up in the next post there will be some German armor, although from the early war period. So stay tuned!


WWII Brits

WWII Brits

Once we are done with the Kursk scenarios from the SkirmishCampaigns we wanted to turn our attention to their Normandy ´44 – Monty´s Epsom book. Now I do not have any Brits ready, so I decided to get started on them in due time (I actually hope to have an infantry platoon, plus support and company HQ painted by the end of the month, with the armour next month). And here are the first. These men are meant to represent soldiers from the 1st South Lancashires. The choice for the 3rd (British) Infantry Division was easy. They landed on D-Day and took part in many of the major operations till the end of the war. So one can get a lot of mileage from them and for the other operations I will have to live with the wrong shoulder flashes. The choice for the 1st South Lancs was a bit more obscure, but their Landing Bach (Sword Beach: Queen White / Brèche d´Hermanville) is one of the two Commonwealth beaches that interest me the most to wargame (the other being Gold Beach: Jig). But I will go into more detail on the Lancs when I finish the next batch, have my good camera back and can show you the details of the shoulder flashes. So here are the first minis:

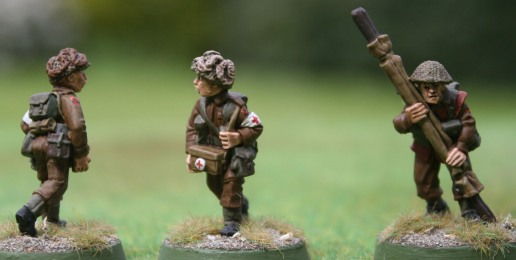
British WWII NCOs

British WWII NCOs
(Left: 2x BAM, Right: WG / BAM)

British WWII NCOs

British WWII NCOs
(Left: 3x VFM, Right: Art)

British WWII Medics

British WWII Medics
(Left: 2x BAM, Right: WG / BAM)

Now these are all pretty fast paint jobs. Unfortunately I feel that the British WWII uniforms by themselves are quiet boring, so I want to get them done fast. The shoulder flashes are freehand and since those are the things that I feel give them a little colour. So this is where I put some extra effort in.

The stretcher bearer on the last photo is wearing one of those leather vests. Right now all the minis are varnished matt, but I im wondering if I should give the vest a coat of satin gloss varnish to give it more of a leather look. What do you think?

British WWII Snipers

British WWII Snipers
(BAM)

Now these snipers were actually done four or five years ago, when I was painting some Paras. Since they are wearing Denison Smocks, I decided to use them as a testbed for Denisons. If I did not like my first attempts, I would not have been forced to use my first try in the unit as all the good-looking Paras. But alas I liked my first try and painted the Paras the same way.

If you look close enough You can see the right eye of the standing sniper. The mini was a very clever sculpt in that the eye was the only part of his face to show!