RSS

Category Archives: Infinity

Contemplation lookout for Infinity

Contemplation lookout for Infinity

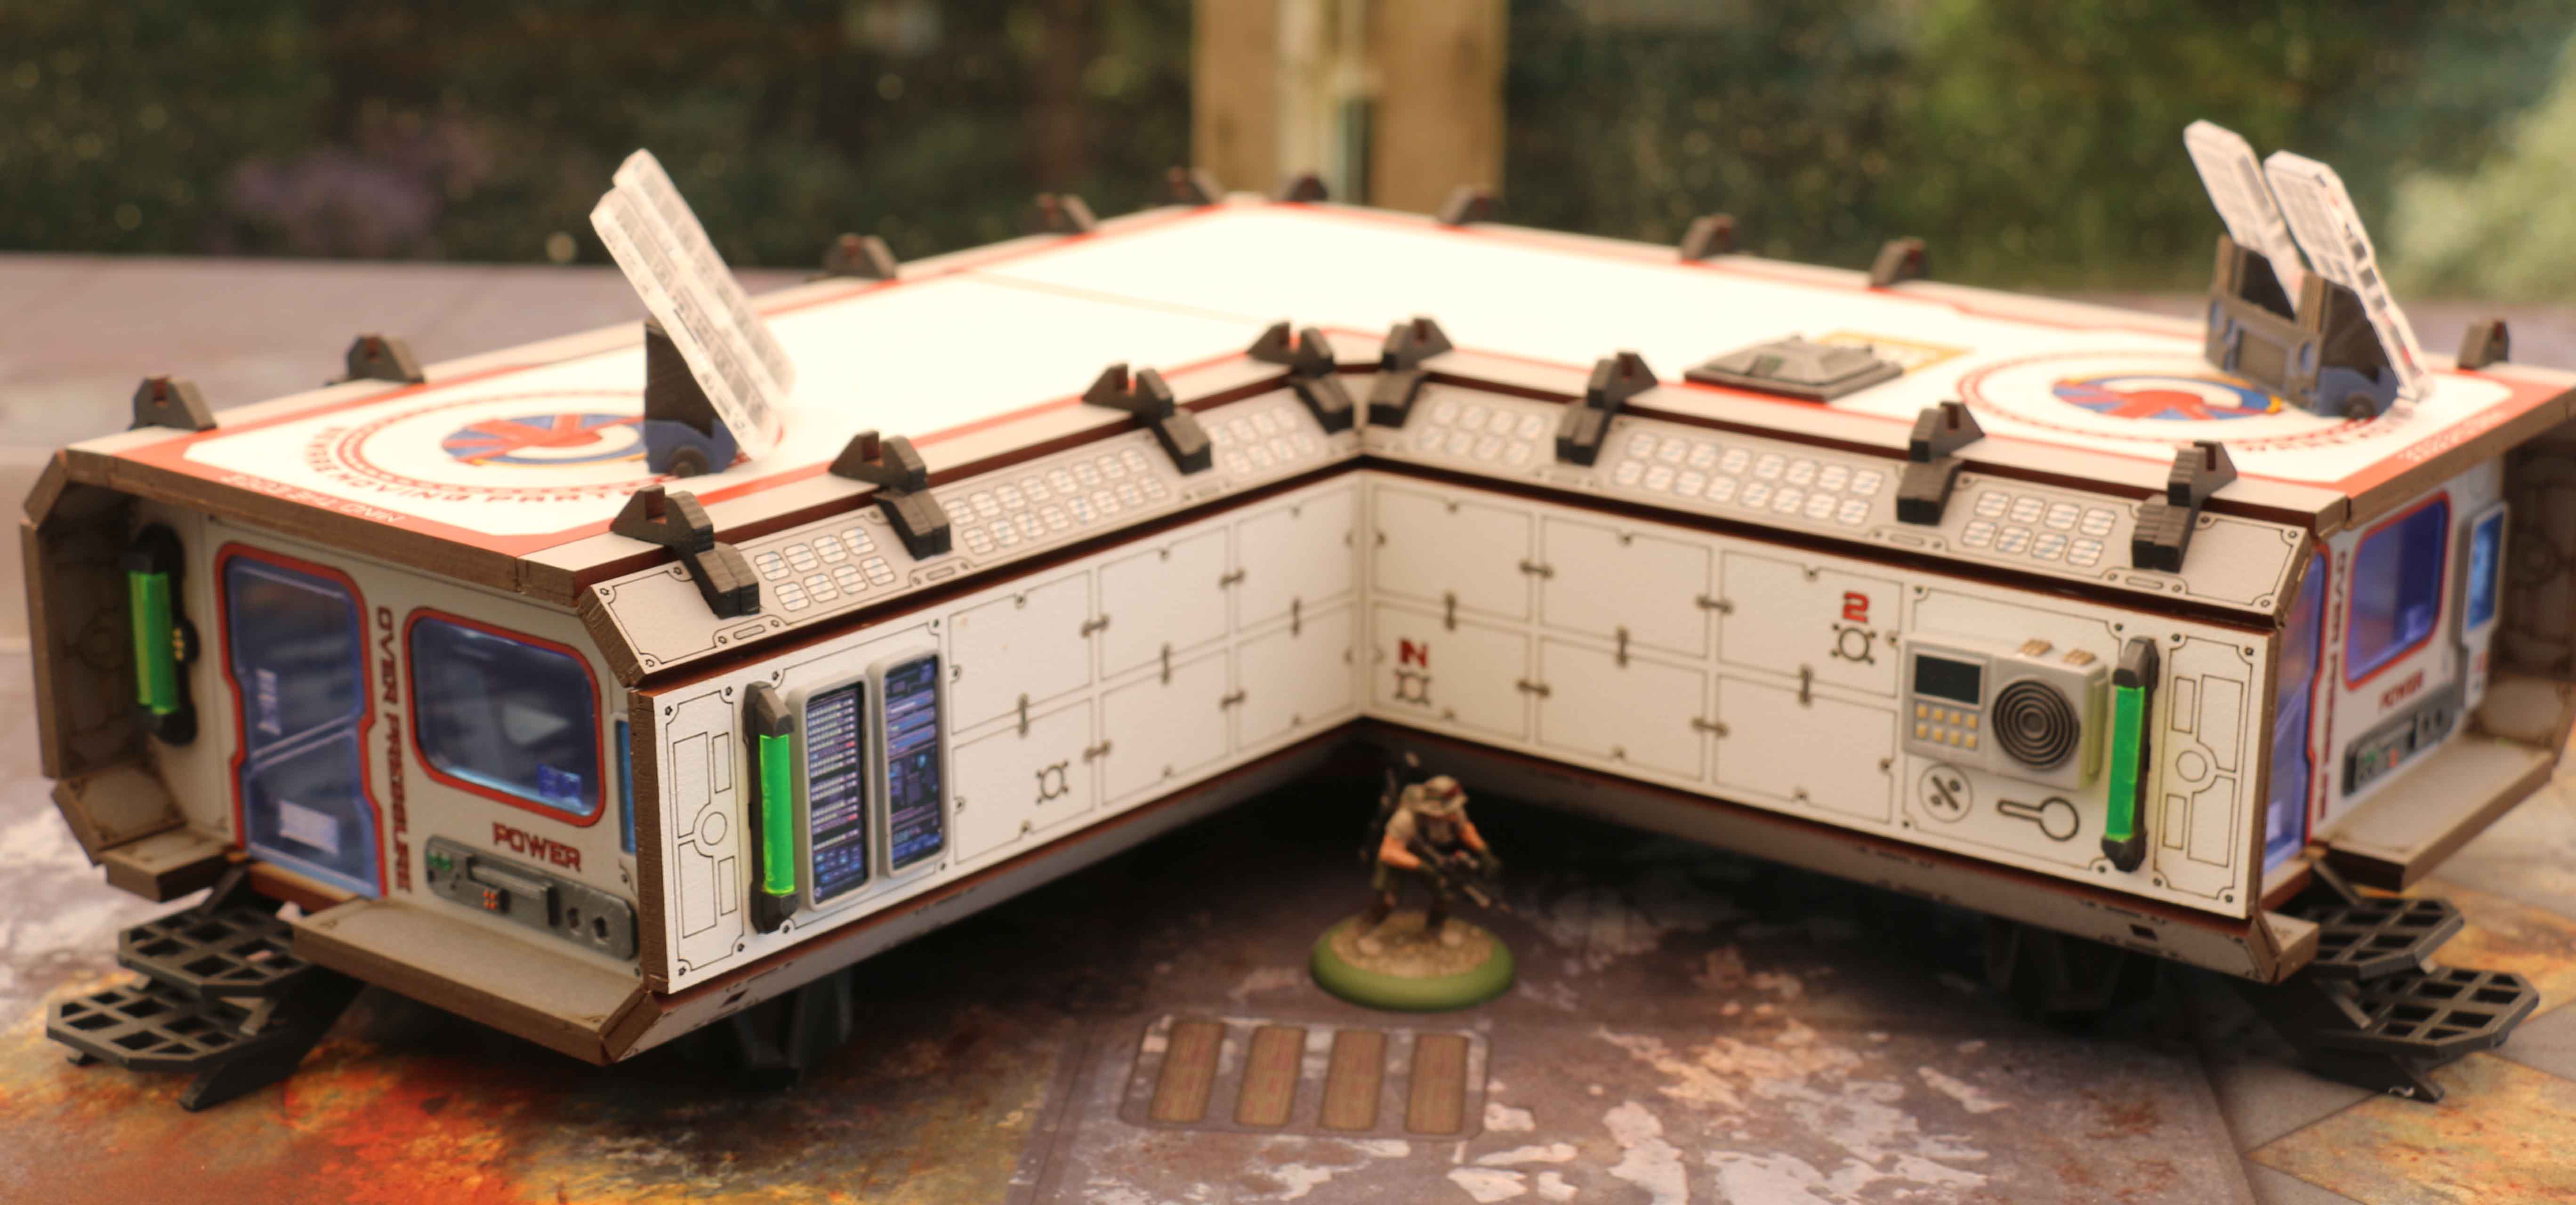
Today we have something from Infinity. While my Forward Base terrain is not completely finished yet, I am thinking about another table with urban terrain. There are two things that have me irritated about most urban tables for Infinity. And since urban seems to be the most popular table type for Infinity, most tables. The first is that most tables seems to be dominated by boxed shaped buildings with railing on top that are all on a single level. I will get into more details when I start more in-depth on my table. Which is what attracted my to Battle Kiwis Contemplation Lookout when I first saw it. So much actually, that I asked them about it when I saw their pre-release test model on a tournament photo. It provides a high lookout with cover, while on the ground level it has a very narrow footprint, leading to more open lanes of fire. At the same point it proves cover from shooters from above on other buildings. As such it should form a challenging centrepiece, or piece in the middle zone of the table.

Contemplation lookout Contemplation lookout

But the other thing that always irritated me is, that everything seems to be so clean, bright and nice. There is no soot, no dirt, no graffiti, no social underbelly. I can not imagine this to be the case. Even in the future of Infinity mankind is still at war with itself (and other races), so if it has not surpassed those habits, why should it have eliminated social inequality? Would the conqueror treat its new subject as good as his own people? I do not think so. So I want my urban table for Infinity to look that way. With graffiti, run down buildings, neglected municipal recreation areas, run down buildings and dirt.

Contemplation lookout Contemplation lookout

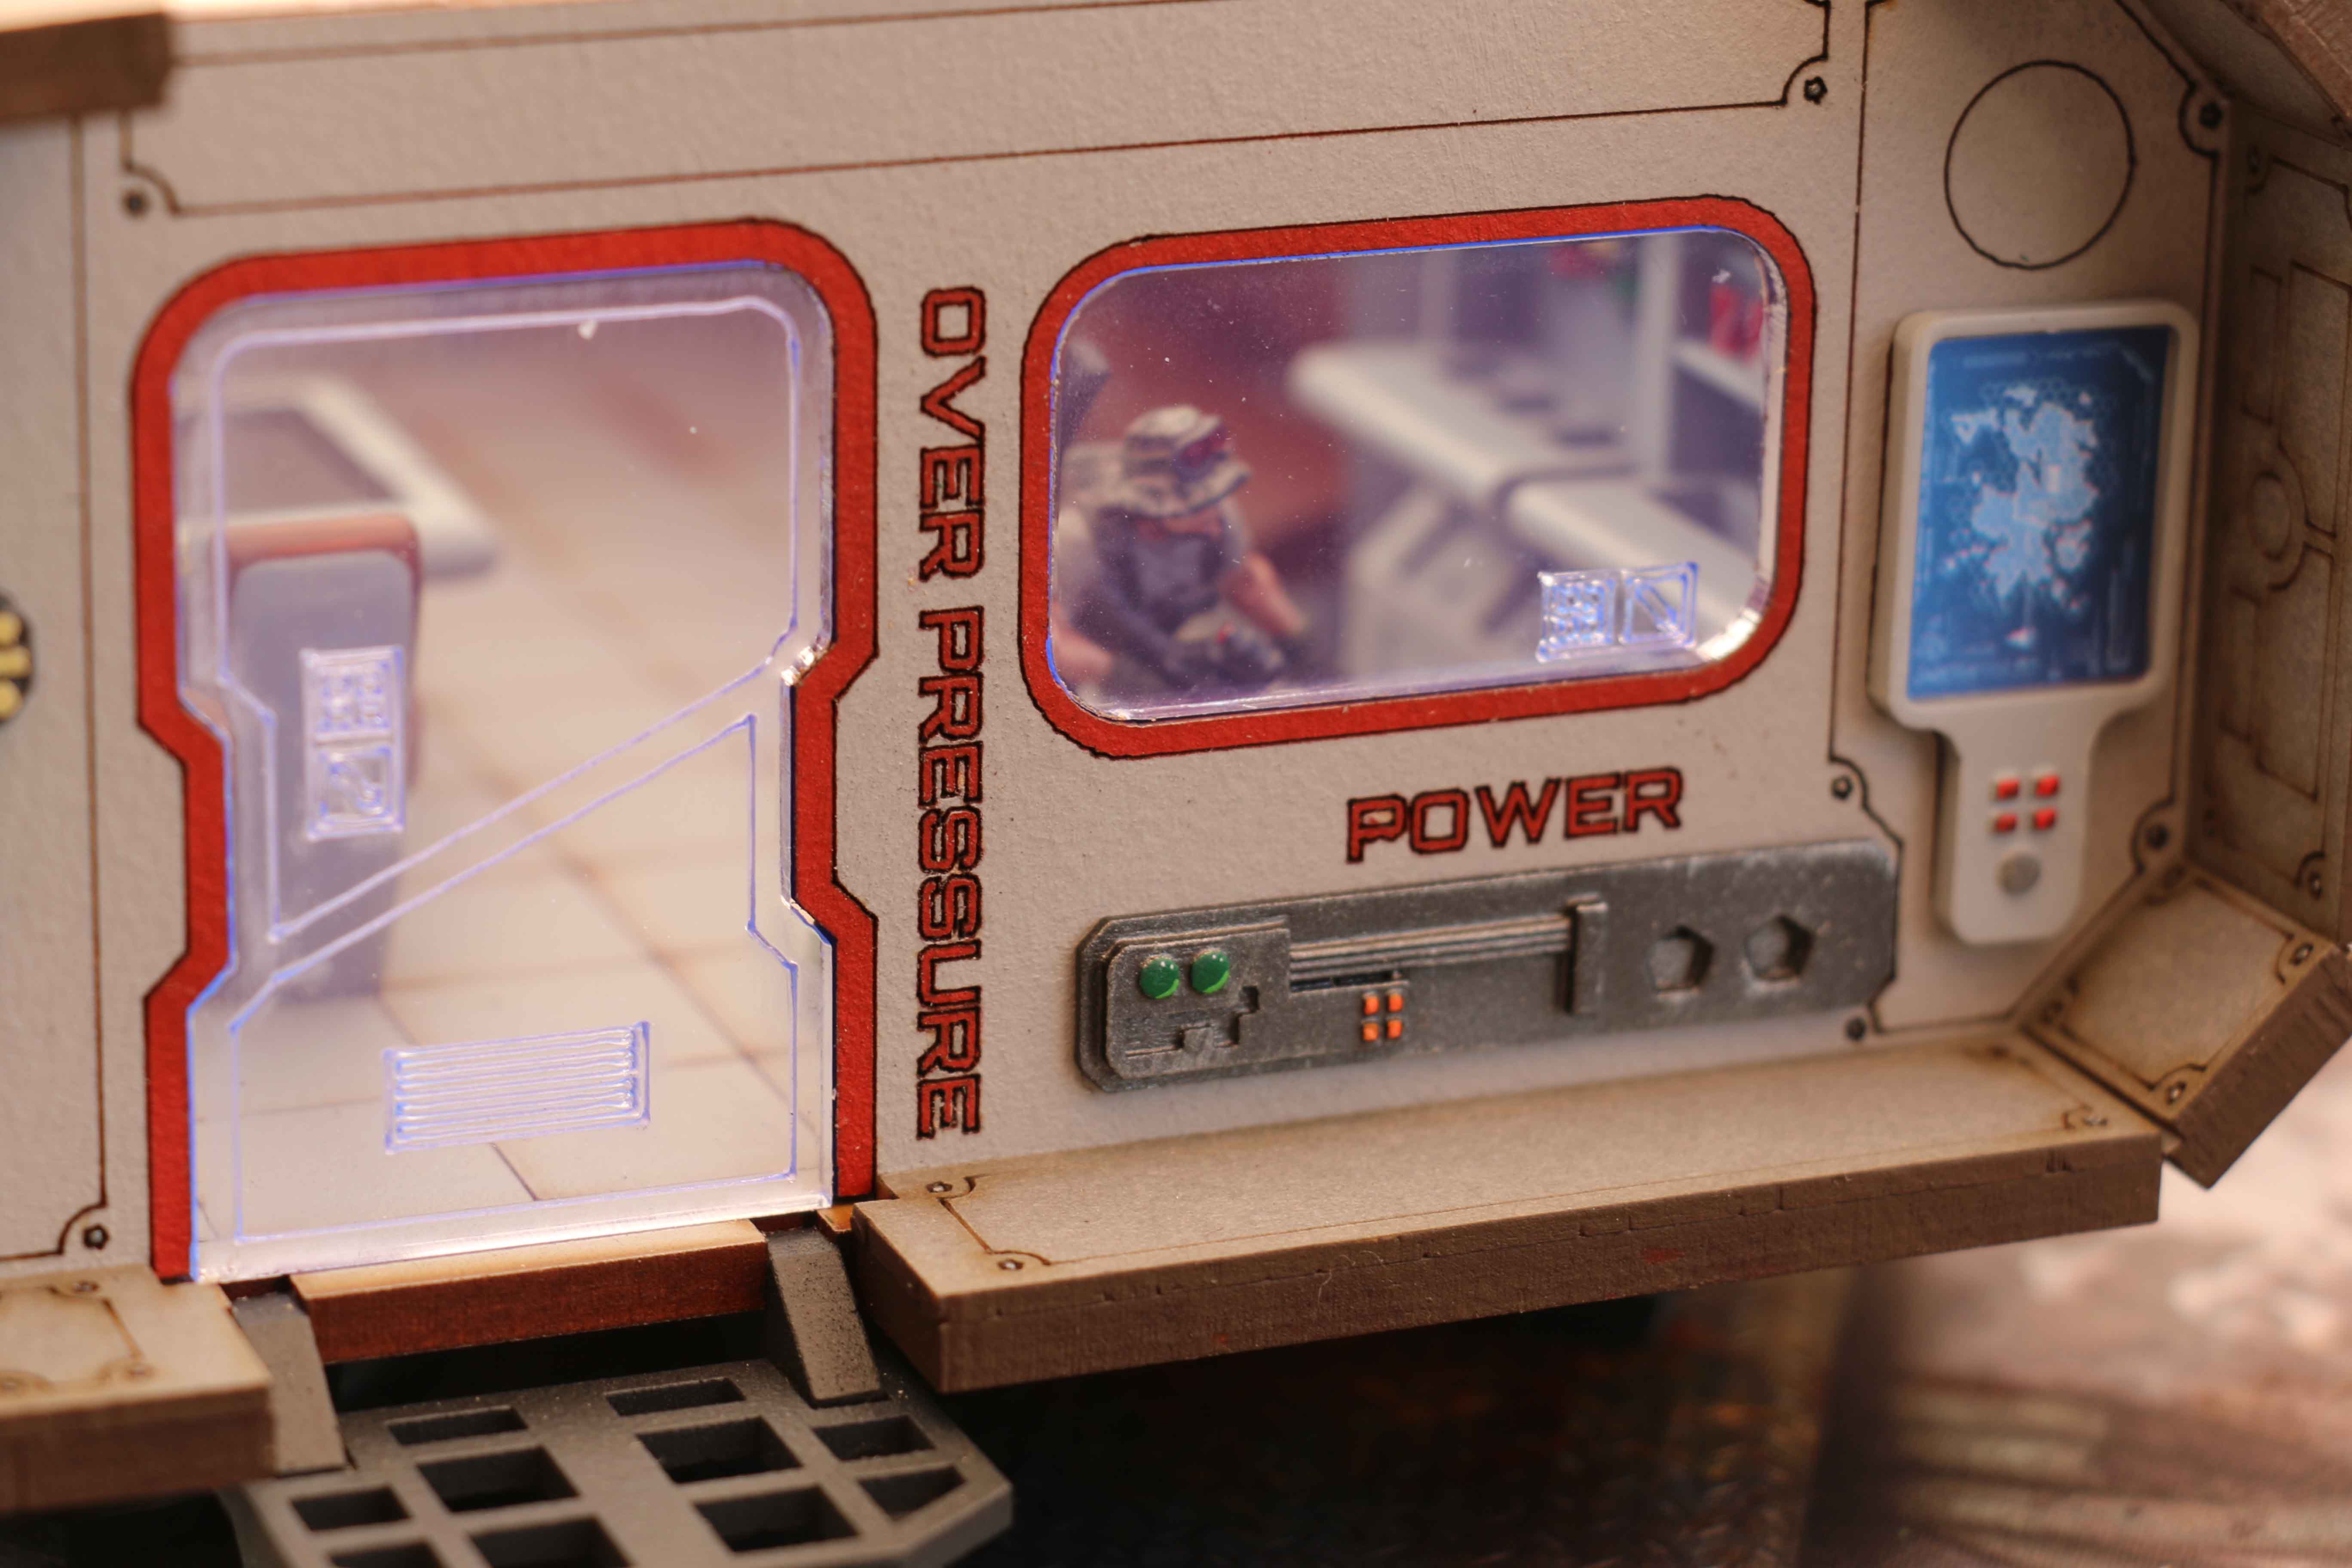
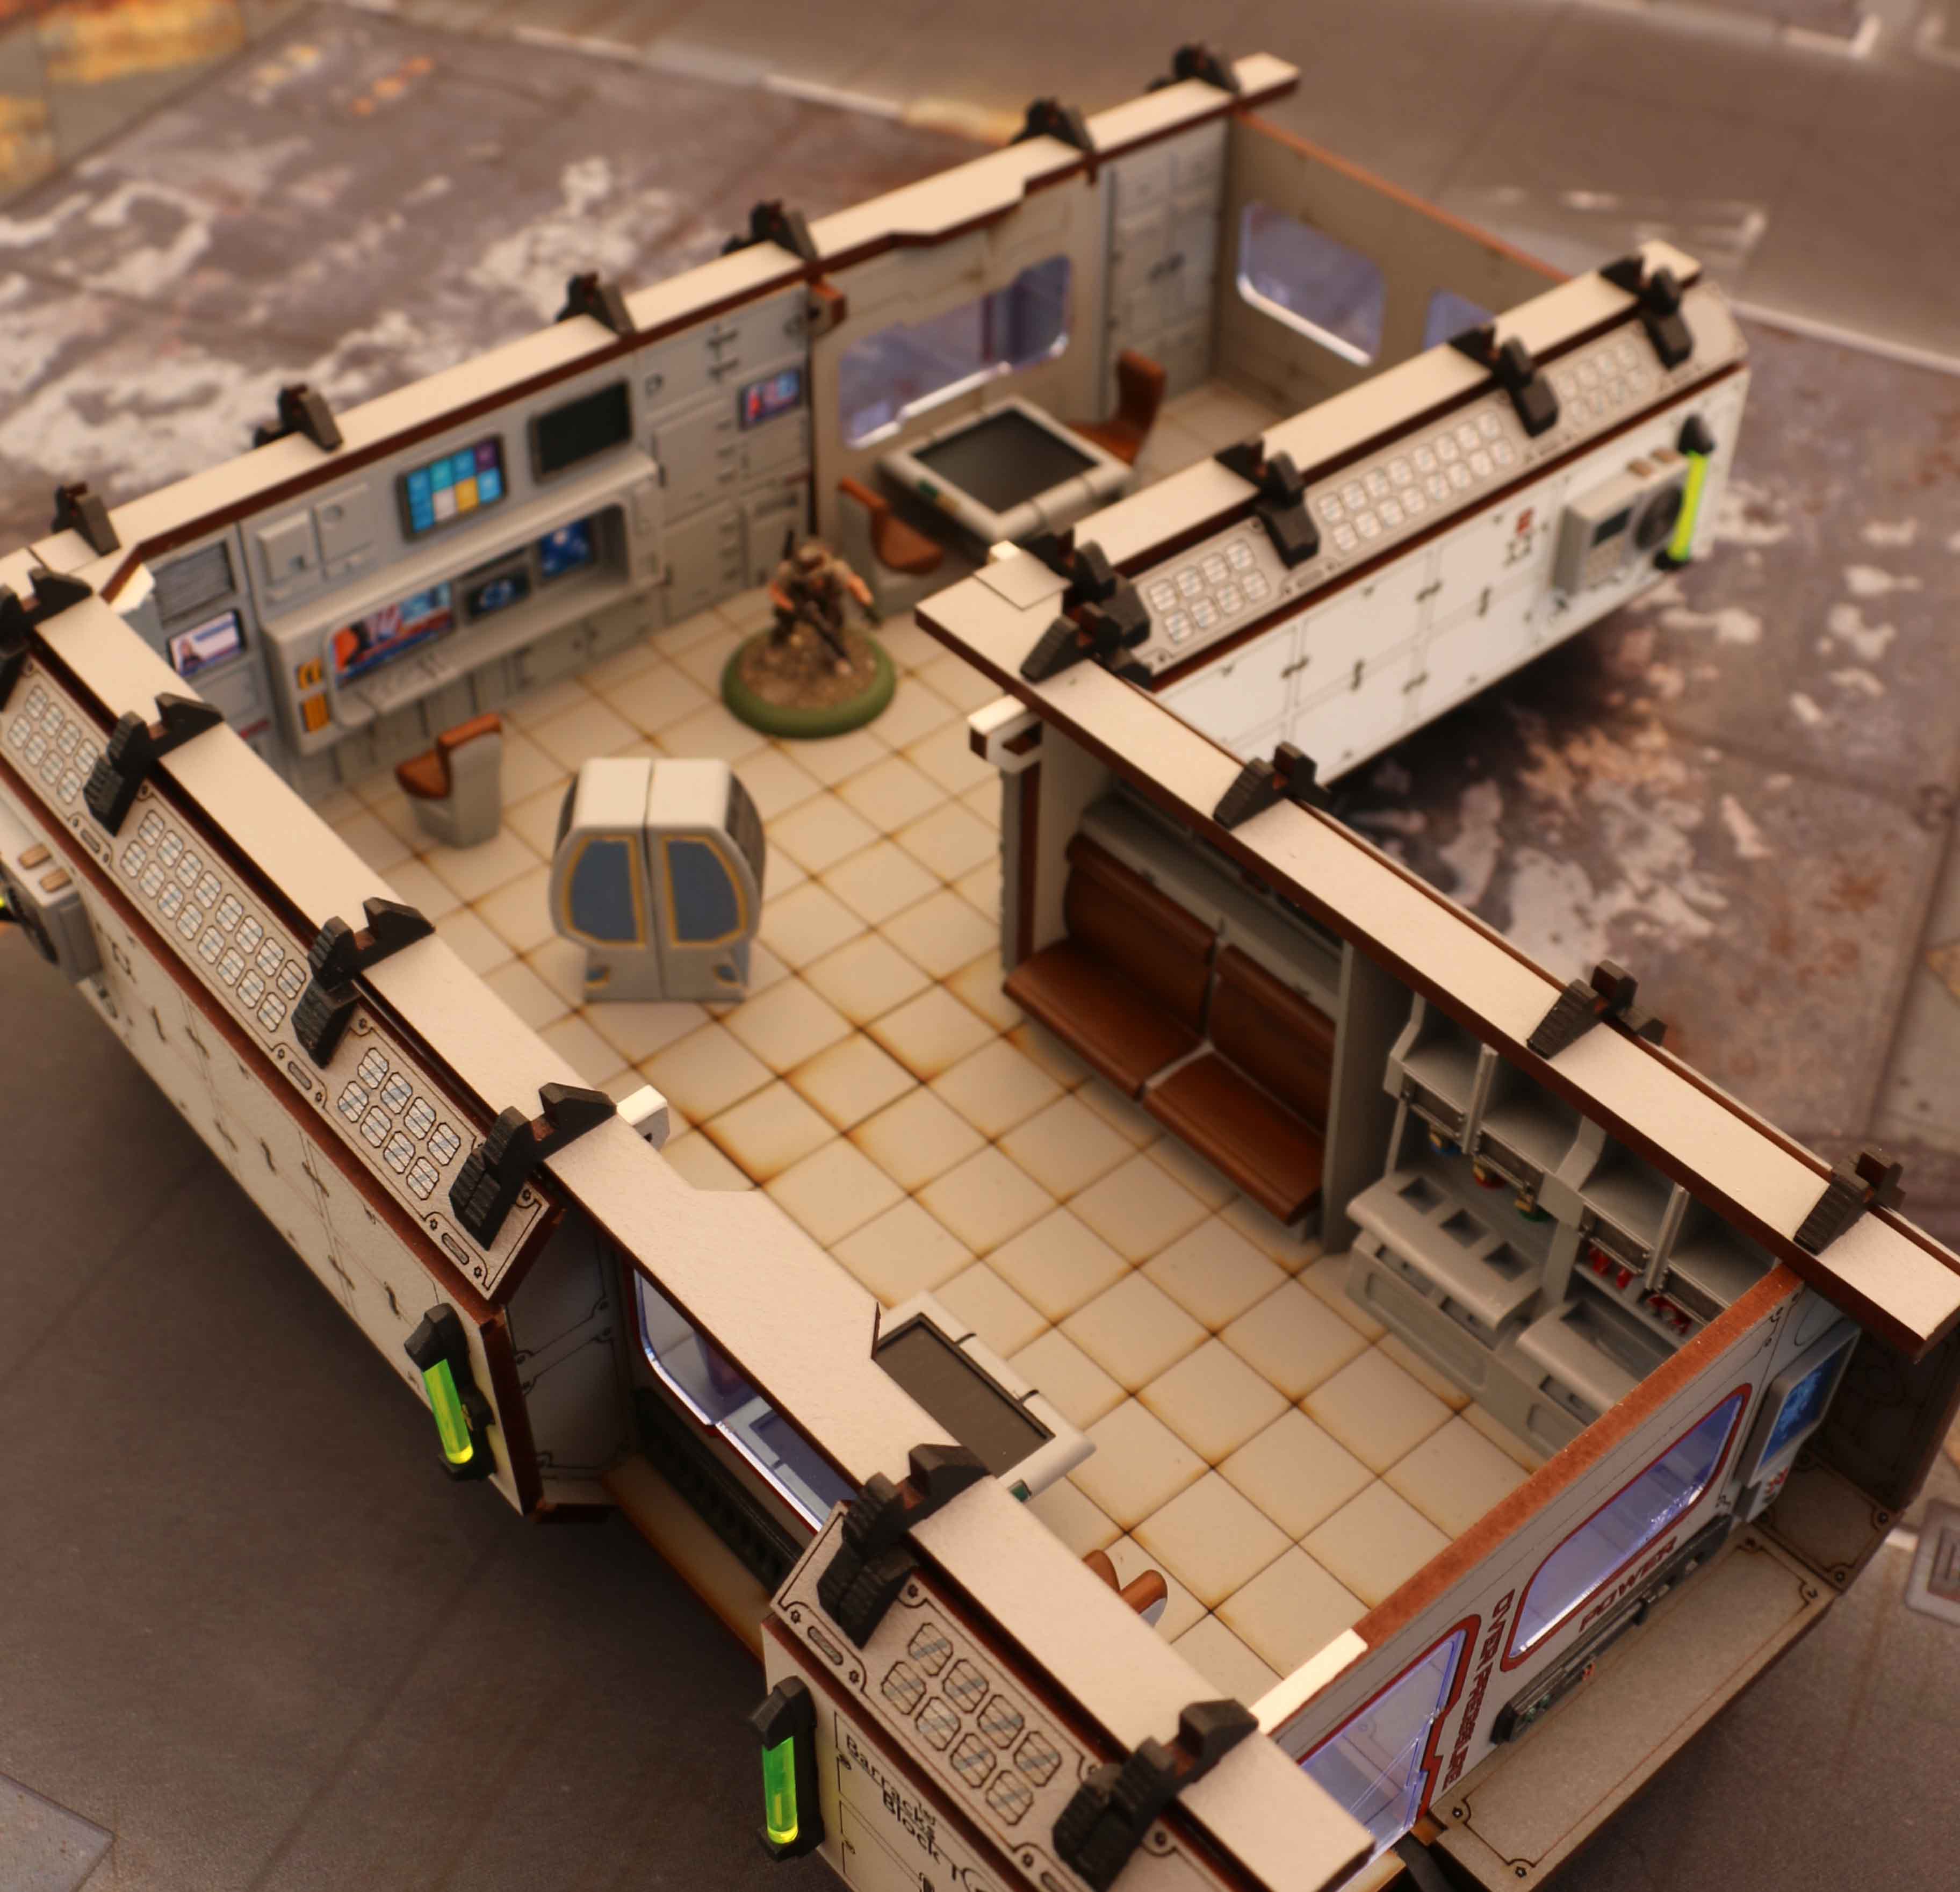
The kit itself come in a nice light off-white with protective film covering the parts. Which is nice, but did not fit my wishes, so I repainted it. A light grey seemed appropriate for a structure of this type, but I wanted a darker white, so everything was airbrushed with Vallejo USN Ghost Grey, which is a few shades darker and has very slight blue hint. The walkways and ramp were airbrushed in a German Panzer grey and highlighted with gun-metal while the upper railings were done in yellow. Here in Germany and many parts of Europe you often seen this on such municipal recreation structures where the designer felt they would look to bleak otherwise and I wanted to pick that idea up. I then painted on various graffiti. As strange as this might sound… while I have an airbrush, I find it easier to mimic graffiti painting by brush, which is what I did here for the most part. Some smaller graffiti were added using a paint pen. I tried to achieve a mix of more artistic graffiti, political or social criticism and the mundane ones.

Contemplation lookout Contemplation lookout

[/caption]Up next everything was given a very liberal wash with highly diluted streaking grime. When I hit the first graffiti made with the paint pen this caused lots of problems, since the white spirit used to dilute the paint reacted with the paint from the pen in that it washed it off. Since the ramp section had already dried, I could not change for a different weathering paint. So I used white spirit to wash those graffiti made with the pen off, replaced some of them with ones painted by brush using acrylics (although not all of them, so there is less graffiti here than planned) and carried on. After everything was given the base dirtying up, I returned to the model with the streaking grime, this time adding real streaks where the rainwater would flow down the building.

Contemplation lookout Contemplation lookout

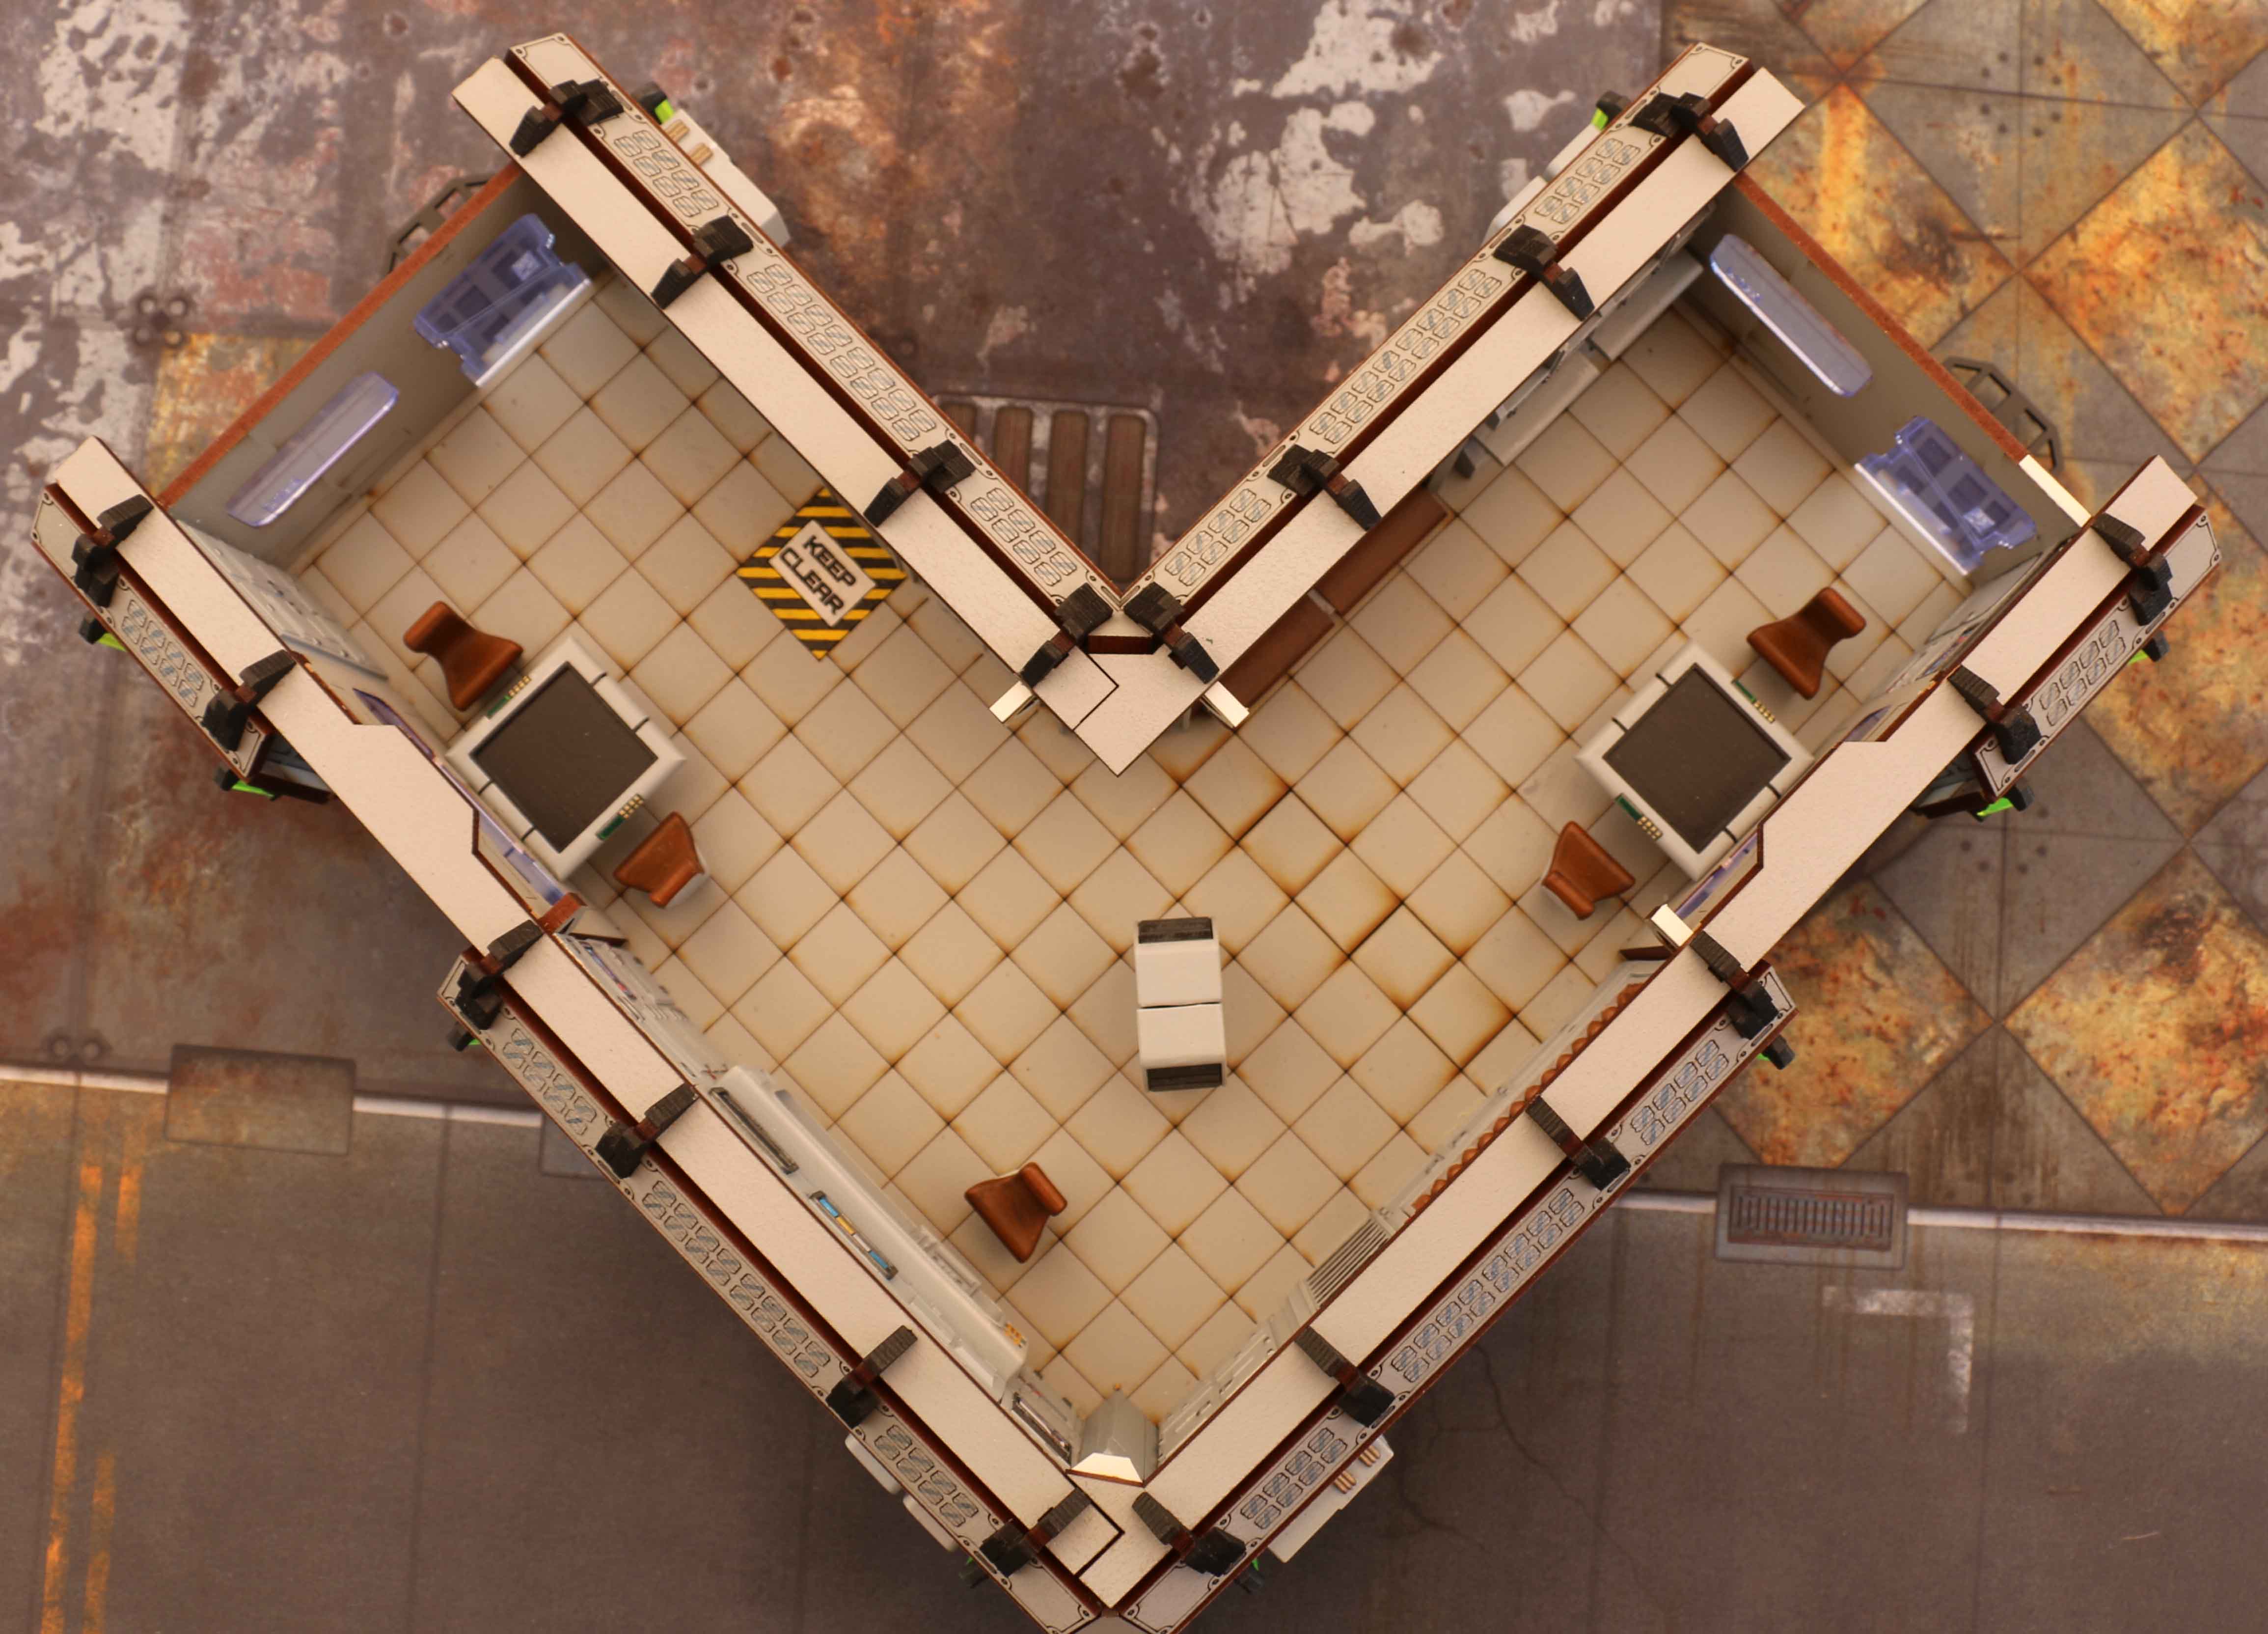
The display on the upper deck could hold an old smart photo to give an interactive display on the table, but I wanted to keep things simple, so I just added some desert like flora to it.

Contemplation lookout Contemplation lookout

I did not glue the display to the platform. While this could in theory form a landing pad or the like, I just wanted to make sure it could be stored more easily. I was contemplating adding rain water streaks to the glass of the display, but upon assembly I felt it looked too nice. On the other hand it stands a bit out with the rest being so run down. What do you think… rainwater marks yes or no?

Contemplation lookout Contemplation lookout


Combined Army Suryats need a lift

Combined Army Suryats need a lift

Just a short post today of some additions to my Combined Army I painted a few weeks ago… a unit of Suryats. While Iam getting ever more of a feel for the game, I do at times struggle with the units at my disposal. Most infantry seem to die too fast, so I decided to paint up a unit of Suryats. With two wounds each, I hope they will be a little more robust, but since I have not fielded them yet, it is still too early to tell.

Combined Army Suryats

Combined Army Suryats

The lift in the background is from Antenocities Workshop as part of their Forward Base range. I repainted it a little to give it more contrast than just the light grey and yellow. Quite happy with it (and the second one from the set). I was contemplating buying the set or not, since they are designed for the post Kickstarter version of the Forward Base, but it seems the Kickstarter version (which I have) and the post Kickstarter version both have the same hight and shape so they fit mine as well. Although I have to say that the lugs where you can fit the security barriers to the roof of most Kickstarter buildings are in the way of them really hugging the buildings. Except for some of the  larger buildings where there are spots where the lugs are further apart. But I can live with that.


Infinity: Red Veil

Infinity: Red Veil

Like all wargamers, I am drawn to nice minis and will use any excuse to buy new ones.

For a long time I always wanted to give Infinity a try, what always kept me from doing so was, that I could not find an army / a faction where I liked all the minis. Or at least the vast majority. The. A couple of years ago they started redesigning their minis and I ended up liking virtually everything they did. So with Warzone taking a direction I did not like and me still wanting to play a more complex SciFi game, I took the plunge and started with Infinity and chose Combined Army (as you know). But could I let things end there? No!

So when the Red Veil box was released, I felt drawn to it. But could I justify another two armies? Not really. But since my mate Martin wanted to try the game as well and did not feel inspired by the minis, I had my excuse. Martin would get the Haquislam, I would keep the Yu Jing.


With the Yu Jing I went mostly with the colours of the studio miniatures, since I liked the Orange a lot. With the clothing I leaned more towards blues than greens, but this is about it. I know this is a bit boring, but I simply liked the orange. Plus it looks a little more accentuated in real life.


Now with the Haquislam I took a different route. I felt, they should look more basic, like nomadic people living in the desert. They should look like their clothing had to blend in with their surrounds, but also like it might at times take them a couple months until they could give their equipment a proper maintenance. I wanted their armour to be the main aspect of their looks. It was painted in an Israeli Defence Force Grey, which was then given some heavy weathering to make it look like the sand had started to blast paint off. Once that was done, the majority of their clothing was done in sand, brown and green colours.

I  have already painted a further 4 minis to give Martin a 300 points army with the ability to exchange a unit here an there. But unfortunately I forgot to take photos, so you will only see those later, when I harass Martin with my camera.

Infinity HVT Free Lance Stringer

Infinity HVT Free Lance Stringer

And to round things off, there is also the High Value Target, that comes with the Dire Foes box that features these two factions. I have to say, that the mini did not really inspire me, so I simply painted her up to look like some high functionary. I did her hair in bright colours as seems to be preferred in the Infinity universe.

All of these minis were paint during the spring of last year.

 
Leave a comment

Posted by on June 8, 2018 in Haquislam, Infinity, Sci-Fi, Yu Jing


Forward Base Habitats 1, 3, 7 & 9

Forward Base Habitats 1, 3, 7 & 9

I continued work on the Forward Base Habitats last year. I started off with Habitat 7 early in 2017, the control tower.

It is an extremely nice kit. It can act as a LOS blocker, the lower walls offer nice partial cover and the control room and landing pad provide nice high vantage points. Again a lot of the different colours were done using the protective sheeting as  an airbrush mask. The only let down was that there were no screens provided. Most of the consoles come with screens printed out on gloss paper that you can glue on the consoles. In this case I painted the screens using greens to make them look like old fashioned monitors. More than a year later, I am still unsure if I like it. Maybe one day I will design my own screens and glue them on.

Up next was Habitat 9, the Armoury. All the wall panels and the table with the weapons add a lot of character to the building. It only has a small logical error. The storage area and counter are separated from the public area of the building by a heavy armoured door and steel bars. But the kits comes with wall racks full of weapons for the entry area. I do not think, that weapons would be placed in a public, unsecured area. So I simply replaced them with warning signs.

Last are Habitats 1 and 3, twice each. These were done last summer. Nothing extraordinary about these. What I did differently from the living quarters I had done before was, that I filled the tabletops for the tables with clear water. This created a much nicer finish than the high gloss varnish I used back then.


Additions to my Combined Army

Additions to my Combined Army

I am still in the process of learning how to play Infinity. The game has a tough learning curve and not getting to play that often does not help either, but I am getting better. Lately games have been getting closer and I even managed a win. What I found most helpful was concentrating on playing with the units I knew well and than adding a new one every now and then to see how it works for me. I found changing many units at once overtaxed me, since I had to keep too many new units in mind.

Anyway, since I only play with painted minis, this has resulted in a constant influx of painted minis.


(I am trying out some new settings here, so please feel free to click on any of the tiles for larger versions here.)

As previously shown, I went with a Havana Brown base and sandy yellow markings. But the more minis I painted that way, the more I felt something was lacking. So I added red markings from here on. And I liked that. So I went back to the old minis and added red markings to those as well (no worries… not going to bore you with photos of those).

As far as I understood the Infinity background for the Combined Army, especially the Morats, they go with a base colour for the environment they are fighting in. In this case brown for the muddy ground of the jungles on Paradiso. Over this they often apply the colours of the fighting unit, in this case red and yellow.

For the Morat units not completely covered in armoured suits (like Rodoks or Suryats) I also added camouflage clothing. With all the bright colours on the minis, camouflage does not completely make sense, but I felt it added some extra character.


Now for the Shasvastii based units I went a slightly different route. The infantry has brown armour, to tie them in with the others. But I felt they were more interested in not standing out. So no brightly coloured markings and rather camouflage clothing or capes.

And I went the same route with the Sphinx TAG.


The only units to which this colouring idea does not apply are the TAGs and drones. Those are done in a dark grey. Why… I always liked that look on the official minis.

I had always been a bit annoyed at the fact, that this meant they did not really match the rest of the army. When they released the Pneumarch of the Ur Negemony as the HVT for the Combined Army, I decided to use that mini to tie them all together. He has the dark grey armour of the TAGs and drones and combined them with the unit colours.

All these minis were painted over the course of the last 1 1/2 years.

 
2 Comments

Posted by on June 4, 2018 in Combined Army, Infinity, Uncategorized


My Combined Army for Infinity so far

My Combined Army for Infinity so far

I just realised, that this is my first post in over two months. I guess my new years resolution must definitely be to post more.

One thing that I spend some a good amount of time on recently is getting started on my Infinity minis, namely Combined Army / Onyx Contact force. So what did I paint so far? You already saw the Xeodrons and Sogarat recently and this is what followed (all based on the Deep Forest bases by Antenocitis Workshop):

Rodoks

First I started with some Rodoks. As I said in my last Infinity post, I was not too happy with the sand tones and the Large OSL areas on the Sogarat. So I shifted to slightly different colors for the sand brown and use the OSL only for the eyes. Much happier with that. As a result I will probably paint the OSL on he Sogarat over, to match him better to the units I have. I als went and painted some geometrical lines over the helmets and shoulder pads instead of just picking out some plates. That also enhanced those minis a lot and will be used on the next Combined Army minis as well.

Rodok squad

Rodok squad

Rodok squad

Rodok squad

Last month I played my first three games of Infinity at a small tournament in Münster Germany and these saw their first use there. I am still a bit unsure about them. Thy packed a lot of punch in their link team and at times this proved to be deadly, but I felt they had problems making up their points and were pretty fast to die. So those will definitely need more testing to see if I like them.

Umbra Legates

I have to say I really loved these minis. Very fun to paint and the animation and poses are great. With these I also diversified the colors for the army by painting the apron-like parts of their uniforms in a reddish leather. It keeps with the brown theme of the rest of the army, but still adds some color. Same goes for the orange accents on these aprons, for they go nicely with the sand colours.

Umbra Legate

Umbra Legate

Umbra Legate

Umbra Legate

Umbra Legate

Umbra Legate

Umbra Legate

Umbra Legate

I played this one (counted as being armed with a spitfire) as part of the Rodok squad / link team at the tournament. Usually the other elements of his team worked out better, but once the range of his spitfire paid off.

Umbra Legate Hacker

Umbra Legate Hacker

Umbra Legate Hacker

Umbra Legate Hacker

Umbra Legate Hacker

Umbra Legate Hacker

Umbra Legate Hacker

Umbra Legate Hacker

I really love this minis. Game wise he was hard to tell at the tournament. During the first game, he never got close to anything hackable, but did very well in close combat. The second game my opponent had nothing hackable, but again he did good in close combat and secured me some vital points at the right moment. During the third game he stood his ground vs. a superior hacker only to be killed by a lucky rifle shot before his first activation.

Dr. Worm and drones

First of all, I found these minis very boring. Not much animation in them and somewhat unimaginative. Th good thing though is, that I got two of the old Dr. Worms off the Internet the other day, which should give me some nice variation in my army (together with the two more drones I already have).

To me they looked like green reptilian skin and that is the way I painted them, again adding more variation to the army. I went somewhat experimental and used some filters on their skin, that I usually use on armoured vehicle models. Otherwise I kept the brown / sand theme for their armour to blend them in with the rest off the army.

Med-Tech Obsidian Medchanoid and drones

Med-Tech Obsidian Medchanoid and drones

Med-Tech Obsidian Medchanoid and drones

Med-Tech Obsidian Medchanoid and drones

The drones were a mixed bag at the tournament. When thy were close enough to an injured / damaged unit the did their job nicely. When they were further away and had to get there, they usually died. That being said, for the minimal price tag they have and the chance to heal / repair other units without getting the Worm in harms way, they seem like a must buy item.

Dr. Worm himself was odd. Only once was he in a position to actually repair one of my Xeodrons and did a good job a it. He too proved very vulnerable, so I found it was good to keep him out of harms way (and more reason for the drones). But  what he did really well was killing unit moving though his LOS with a quick reaction shot.

Unidrons

These kind of are the linking element between my big TAG and the normal infantry in my Combined army. I decided to paint the (Onyx) TAGs and remotes with black and grey armour to make them look more menacing. Obviously this is at odds with the brown and sand of the infantry. But since the Unidrons come from the same bio-engineering process as the TAGs, their skin colours provide the link.

Unidrons

Unidrons

Unidrons

Unidrons

Before the tournament I had only painted these, because they were part of my starter and were on my workbench. During the tournament I really liked these. Yes they were more fragile than the Rodoks, but thy cost far less and seemed to provide better value for points. Plus these could be upgraded to forward observers for one point, which allowed them to claim the objectives. In fact I liked them so much, i ordered their box set.

Overdron

It was the Xeodrons that drew me towards the Combined Army when I decided to start with Infinity, so the Overdron was another must have item for me. The Overdron itself follows the colour scheme of th Xeodrons, while the Tin Bots that are to protect him follow that of the Unidrons.

Overdron and Tin Bots

Overdron and Tin Bots

Overdron and Tin Bots

Overdron and Tin Bots

Overdron and Tin Bots

Overdron and Tin Bots

Overdron

Overdron

Overdron and Tin Bots

Overdron and Tin Bots

Did not use him during the tournament, but on the grounds that he is even more expensive that the Xeodrons and that I had problems squeezing just one of them into 300 points, I daresay, I will rarely use him. Bit of a shame!

And that is it. Really like my force so far. So much so, that I felt a group shot was due:

Combined Army group shot

Combined Army group shot

Before anyone asks. I came last during the tournament, but I learned a lot. And I was quite happy with my result, since I managed to score a draw in one of my games. Not bad for my second game of Infinity ever.


4 Comments

Posted by on December 23, 2016 in Antenocities Workshop, Combined Army, Infinity, Sci-Fi


Infinity Combined Army Xeodrons and a Sogarat

Infinity Combined Army Xeodrons and a Sogarat

Well I am off on holidays which gives me the time to finally post some pictures of the stuff I finished in recent weeks and months.

As some of you may have realised from my recent terrain posts, I have started to take an interest in Infinity. A lot of the armies do look interesting, but the one to fire up my interest the most is the Combined Army. Right now I am just painting up the minis I like the most. I have to admit, that I do not know yet which ones really are good or which role they fulfill in the game, so do not expect too much info on the units themselves. In the end, I will do just what I always did when it comes to SciFi games… paint what I like and learn to play them afterwards.

Anyway… here are the minis. Up first is a pair of Overdrons. I really like the models. They are huge, about twice as tall as a human miniature. They have a nice mix of external armoured plates with the musculature / skin underneath. The original studio miniatures were painted with very dark armour and orangey skin. This created a very dark and menacing look which I wanted to go for, even though I had something different in mind for the rest of the army.

Infinity Combined Army Xeodron

Infinity Combined Army Xeodron

Infinity Combined Army Xeodron

Infinity Combined Army Xeodron

Infinity Combined Army Xeodron

Infinity Combined Army Xeodron

Infinity Combined Army Xeodron

Infinity Combined Army Xeodron

Infinity Combined Army Xeodron

Infinity Combined Army Xeodron

I also wanted to try and see how close I could get to the looks of the official studio miniatures. Those had a black base colour, over which several shades of grey were airbrushed. The edges of the plates where highlit with even lighter greys, finishing with an almost white. I found the idea of the softer shading together with the strong contrast at the edges interesting, but while painting, I quickly found I did not like this. So I went with somewhat softer contrasts airbrushed onto the miniature and only did the edges in a medium grey. Not as striking as the original, but more to my taste.

Infinity Combined Army Xeodron

Infinity Combined Army Xeodron

Infinity Combined Army Xeodron

Infinity Combined Army Xeodron

Infinity Combined Army Xeodron

Infinity Combined Army Xeodron

Infinity Combined Army Xeodron

Infinity Combined Army Xeodron

Infinity Combined Army Xeodron

Infinity Combined Army Xeodron

And here is the pair together. Most people base their Infinity minis in a very clean and modern way. But I wanted something different so I based mine on jungle bases, or rather the Deep Forest bases by Antenocities Workshop. I also painted some mud splashes on the lower legs to round everything off.

Infinity Combined Army Xeodrons

Infinity Combined Army Xeodrons

Antenocities Workshop deep forest bases

Antenocities Workshop deep forest bases

As I said before, I want something different for the rest of the army. Something that makes them blend in with their surroundings. So the rest of the army will be painted in a very dark brown with consecutive highlights to a mid-brown. Markings / sections of the armour will be in a sand colour.

I am not entirely happy with the way this one turned out. Somehow the sand colour itself and the fact that I picked out individual plates remind me, too much of 40K minis. Before I left for my holidays, also started with some Radoks. In their case I picked out fewer individual plates, but painted some patterns on the larger ones. I also used a different colour to highlight the sand parts. All of this created a look more to my taste. But you will see those in a few weeks time. The OSL lights on the arms and legs are also not completely my taste. So I guess I will use those less on the other minis.

Infinity Combined Army Sogarat

Infinity Combined Army Sogarat

Infinity Combined Army Sogarat

Infinity Combined Army Sogarat

Infinity Combined Army Sogarat

Infinity Combined Army Sogarat

Infinity Combined Army Sogarat

Infinity Combined Army Sogarat


Forward Base, Habitat 4

Forward Base, Habitat 4

So it is time to upload the next Habitat from The Forward Bas Kickstarter. This time it is Habitat 4, which is the large L-shaped living quarters. All in all the general process on this one was the same as it was with the previous one. So a lot of the detailing was doing by using the masking film as a mask and airbrushing the habitat. But there are a few new things on this habitat and a few things and others I skipped on the previous one that I would like to go into more detail here.

Antenocities Workshop Forward Base Habitat 4

Antenocities Workshop Forward Base Habitat 4

First of all, you can see that this is a massive habitat as well. Not as tall as the previous one, but the footprint is almost as large and due to its L-shape it offers some interesting LOS options compared to a square or rectangular building. Also, this being a living habitat it features more monitors and air con units that the workshop and I really like how this adds character to the model.

Antenocities Workshop Forward Base Habitat 4

Antenocities Workshop Forward Base Habitat 4

Now with the previous post, the solar panels on the roof were a little harder to make out. But there you get a clearer view of them, up on the roof. I really like the mirrored version you got with the KS. They are quite reflective and look the real deal as a result. If you look at the upper edge of the walls, you can see that the models come with solar panels etched into the MDF and I simply could not resist, but paint them up. But even though I airbrushed them with chrome paint, they are by far to as shiny as the moveable panels on the roof.

This photo also shows the Habitat Logo that Angus designed for me. The design will be repeated on the other barracks building, just with other numbers. And as you can see, the font, general arrangement and simple icons are present in all the logos, which should give them all a unified look in the end.

Antenocities Workshop Forward Base Habitat 4

Antenocities Workshop Forward Base Habitat 4

Antenocities Workshop Forward Base Habitat 4

Antenocities Workshop Forward Base Habitat 4

The ends of the habitats really live up with he clear acrylic windows and doors, as well the resin parts and the red markings. I was actually quite surprised how much light actually gets into the building. As you can see on the upper picture, the roof is in place and still you can see fairly far into it.

Antenocities Workshop Forward Base Habitat 4

Antenocities Workshop Forward Base Habitat 4

Antenocities Workshop Forward Base Habitat 4

Antenocities Workshop Forward Base Habitat 4

As strange as it sounds, this corner is actually my favorite part of this building. I cut the edges of the corner panels off at 45° and the really sink into the wall. It is hard to explain, but in really live, this gives it a really homogenized look, that makes the whole building appear like it was not made from MDF. I would advise everyone to do the same, especially since the kit comes with twice as many corner panels as you need, so even if you do not like the results, you will always have a spare part.

Antenocities Workshop Forward Base Habitat 4

Antenocities Workshop Forward Base Habitat 4

So as I promised in my last post, here is a better look at the Imperial (Warzone) / Ariadna unit logo that Angus  as kind enough to draw up for me. I am really happy with it. As you can see, after airbrushing it in red there is still a lot of work to do there, but it is worth the effort I think. And as you can see, I tried different colors for the keep clear area (the backdrop for the text is now white instead of red). I like this much better than the version I used on the other building an shall stick with this.

Antenocities Workshop Forward Base Habitat 4

Antenocities Workshop Forward Base Habitat 4

Antenocities Workshop Forward Base Habitat 4

Antenocities Workshop Forward Base Habitat 4

Antenocities Workshop Forward Base Habitat 4

Antenocities Workshop Forward Base Habitat 4

Antenocities Workshop Forward Base Habitat 4

Antenocities Workshop Forward Base Habitat 4

One of the best thing about these buildings is the interior. There is the option for resin wall elements and furniture, both of which I decided to go for and they add so much to the building. I wanted a somewhat sterile look for the interior of the buildings. After al these are prefab buildings, serving as quick to deploy military or scientific outposts. If you look at SciFi movies, they usually convey this sterile look for these types of buildings and that is what I wanted to copy. So all the panels and furnitures are painted in an US Navy ghost grey and given slight highlights. Afterwards I accepted the buttons, handles and panels, painted the couches and seats as faux leather. The monitors simply received the printed screen provided with them. For the next couple of buildings, i really need to make sure the photos are more focused.

The one thing I am not too happy with yet is the double personal container unit standing on the floor on the bend of the L. It somehow does not seem to fit in. But I already have my sights set onto a set of consoles from AW that will probably replace them in due time. I just hope I will be able to remove them, without doing too much damage to the floor (already glued them to the model).


So, this is it for today… hope you liked it! Not 100% sure, when I will be able to post the next building. We did the test set-up for your game at Crisis the other week and found that we still needed more terrain than I I had though. Plus i sighed up for an Infinity tournament in November and I would like to play with a painted  army. But I will still try to mix one more habitat in from time to time.So please stay tuned!